Online Sports Statistics System (Statistician Help Page)
(Version March 20, 2024) (See video training on YouTube.)
Click this line for the Quick Start Guide Open Quick Start Presentation (PDF) Open Full Help Presentation (PDF)
Background. The Online Sports Statistics System provides
league statisticians and easy way to maintain and track the scores and
standings of teams in all sports and divisions. Here's what it does and
how to use it effectively.
Main Statistician Admin Menu: When you click on Statistician or Administration, you'll see the main Statistician Menu:
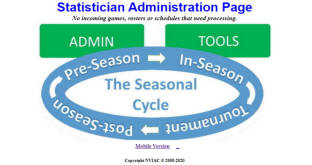
This illustrates the cycle of the seasons. For each cycle, there are menu items under the appropriate cycle.
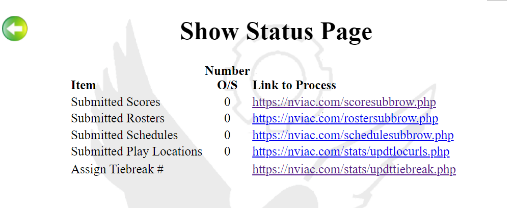
NOTE: When you click on a Seasonal Cycle Phase, a Statistician Checklist for that Phase opens in a new window.
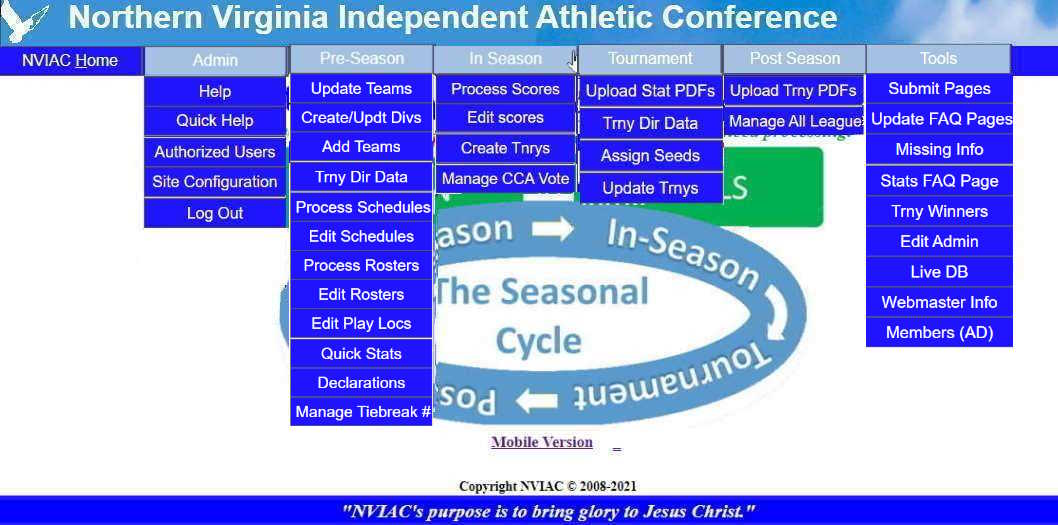
NOTE: Here's how to use the menu graphic above.
|
The Statistician Administration Page provides the Statistician the ability to set up the initial League, assign the member schools/teams, ant then create seasonal divisions with respective teams. There are two sections: Site-wide Administration and Seasonal League Division Management.
It is arranged in the order in which you need to do the actions.
The top section contains any time actions -- you may add users or change statisticians at any time, for example. It also has a set of tools you may need to use at any time.
The lower section is arranged in the chronological order you will likely use them. Pre-season actions, in-season actions, tournament actions, and post-season actions.
Overview: This system provides the following:
- Setup and maintenance of authorized users, statistician information, site variables (scoring methods, per cent played minimums, etc.), and titles.
- Setup and maintenance of teams who belong to the league. As the teams/schools may change from time to time, it is easy to add or remove respective teams.
- Setup and maintenance of League Divisions for team sports for each of the sports seasons. For example, Varsity Girls Basketball. You can assign any or all of the League teams to any Division, but the teams must belong to the League.
- Entry of all games scores as occurring.
- The statistics reporting function shows a list of the games played, as well as a Statistics Grid showing who won and who lost, and the computed stats for each team (win/loss ratio, point for/against, etc.).
- End-of-Season online Tournament Bracket creation and management.
- Automatic generation of League Division Standings and Tournament Brackets.
- Upload mechanism for archive PDFs, team/school logos & pictures, All League players, etc.
From the menu, you can access every aspect of the Statistician management functions, by cycle stages.
Menu System: The Statistician Menu provides access to all functions, by cycle stages:
Note that when you log into the Statistician System, you will see a new menu depicting the phases the Statistician supports during the seasons.
The drop-down menus provides access to the following functions:
- Standings - This opens a new window with the Standings Grid, the Head-to-Head standings table, the Total Games Played Against Each Opponent, and a listing of all games played to date. While this is the same page that is used to show the current statistics to any user who access the site --the League Standings page, this link can be used to access a Statistics page using the database, even for a Division which may already be archived on the main site's Standings page.
- Games/Scores - The Statistician (or by anyone who has been authorized by the Statistician) enters all of the reported scores as they are received from the teams. This is accessible only by a logged-in authorized system user.
- Administration - This opens the main page for the Statistician to make any changes in the sites needed
- Trny Brackets - This provides an on-line Tournament Bracket creation and maintenance. This is accessible by the League Statistician and the designated Tournament Director. You can also access the individual Tournament Bracket items using the submenu that appears when you hover over the Trny Brackets item:
- Help - This page
- Log Out - Used to log out and block the Statistician administrative system when all actions are complete
- What's New - This page documents changes made to the site as improvements are made. Use this to see if there are new features that will make your job easier.
- Edit Main Page Banner - This opens an edit page where the banner on the home page can be edited. This is where you can highlight new things on the website, or in the season.
- Show Summary Tournament Winners - This opens a summary of the winners for every game. It saves having to open each Tournament Page to find the winners.
- Mobile Version - This opens the Smart Phone version of the NVIAC Home page. This is more useful on an iPhone or Android phone. It's a small format version that works better on phones or tablets.
- Statistician FAQ page - This is a Frequently Asked Questions (FAQ) Page specifically for Statisticians (you). There's a link on that page to go to the EDIT Statistician FAQ page. This is where you can leave notes to your successor when you find something that gave you a problem or an issue. Add the items just as you add items on the Main FAQ page.
![]()
Logging IN:
|
![]()
Menu Item: Standings
This opens a new window with the complete listings of all pertinent statistics for a chosen Division. It is not password protected because it is read-only -- no changes are allowed. A League Division abbreviation can be appended to the address so that the chosen Division Statistics page opens immediately, which is how the Standings menu selection works for visitors to the website.
NOTE: When the standings are complete for a League Division, the standings page is exported to a PDF document and future links on the publicly accessible Standings page will point to the PDF archive version instead of creating the Standings page from the database. The Statistician may need to access archived Divisions from the database -- if it is no longer in the drop down list, manually enter the League Division abbreviation at the end of the league= string.
You can choose any other Division when the new page opens, but a key use of this function is to show the current statistics for an active Division. For example, the link to the active League Division teams (for example, Winter 2008 Girls Varsity Soccer) is added to the Standings Page address so that that specific Division opens automatically when you click on the standings link on the Events-Standings link in the main menu. The Events-Standings page is automatically generated from the list of League Divisions that have been marked as Active in the Statistics System.

Choose a League Division to get the Standings. Use the dropdown list to find the Division of choice and the press the [Go!] key. You'll see the full statistics that are available for that Division. Note: You must press the [Go!] button to open that Division's standings . Note that the specific elements displayed in the Standings Grid ( Winning Team, Losing Team, Scores, Date) may be configured in the Site Statistics Configuration section. If the Statistician needs to access Divisions not on the dropdown list, the League Division abbreviation will need to be manually entered after the league argument (league=2013SBGM for example).

Game Remarks: When you hover the cursor over a game, any details entered (such as the individual sets that make up a volleyball match) will be shown in a pop-up label, similar to Tool Tips.
Full Sort Capabilities: The links at the top of each column allow you to sort the whole Grid by that column. Each time you click that link, the order will be reversed - Ascending to Descending to Ascending, etc. This is helpful if you want to compare teams or find the greatest Points For/Against, the highest Win/Loss ratio (to use to set the end-of-season Official Seed), the most games Won/Lost/Tied, etc.
If you'd like to create a PDF of the page, use the File Save As PDF option in your broswer. You may then email the PDF file or print it to any printer. The PDF file is formatted as indicated in the next paragraph. The PDF file is formatted as indicated in the next paragraph.
When you use the File-Print option in your Browser, the page, you'll get a page arranged for most efficient printing:

Notice that the Menu and Division Selection drop-down list are removed to print only the Division Statistics, and all of the Grids (see below). These reports also include the name and contact information for the Statistician.
Head-to-Head Wins Grid:

The Head to Head Wins Against Each Opponent grid shows how many games each team has Won against their opponents. This is often used as a tie-breaker at the end of the season. While the Head to Head statistics can also be gleaned from the Standings Grid, this grid provides a much simpler summation for quick reference.
Total Games Played Against Each Opponent Grid:

The Total Games Played Against Each Opponent grid provides an assessment for each team, to ensure that every team plays the minimum number of opponents for the season. The minimum percentage is specified by the League. If a team fails to play the minimum number of teams, the % Played column shows the actual percentage highlighted in RED. The % Played value can be specified in the Site Configuration screen.
All Games Played Listing:

The All Games Played listing shows all games that have been played for this Division. All of these games are reflected in the preceding three Grids. This is a convenient spot for Athletic Directors to ensure that all of their teams -- games have been properly reflected in the Statistics.
For any games that have Remarks entered (such as Volleyball sets that make up the match), the Remarks will show as you hover over the scores in the Standings grid, and at the end, in the All Games Played listing.
Menu Item: Standings for Split and Multiple Divisions
The Current Standings and Standings History pages
differentiate between the single Division standings and the Split-Division
standings.
Further, when there are too many teams for a single Division, the decision may be
made to have two Divisions for the season. Team A and Team B.
See Multiple Divisons below.
.png)
The non-split Divisions will open the standings as indicated above. The Split-Divisions standings page will only be opened for Split Divisions.
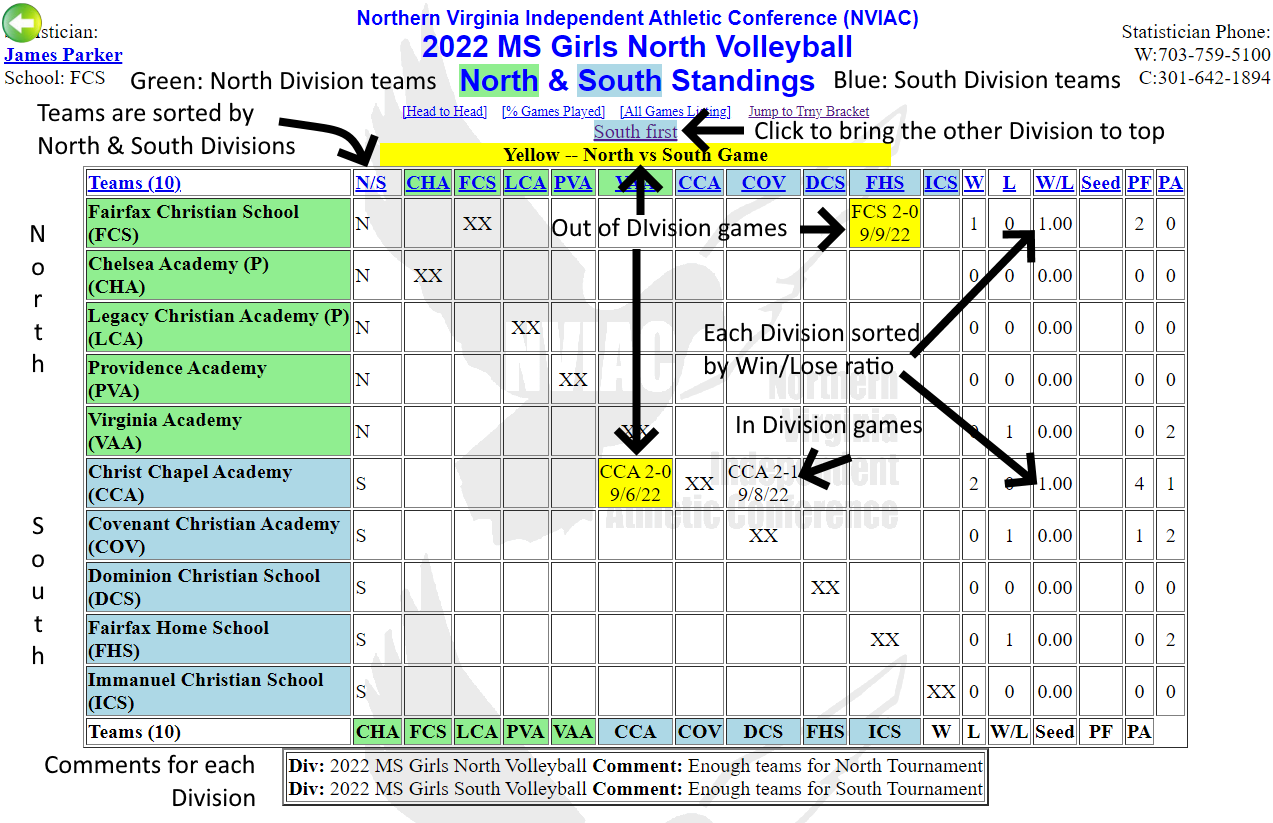
Both Divisions are shown on this page and are color-coded to indicate North (green) or South (blue).
Games are played within the same Division and across Divisions. The cross-Division games are colored yellow to distinguish the from the normal, in-Division games.
Each Division is show initially with all of its Win/Lose ratios sorted from highest to lowest. This will help the seeding process.
The link at the top, South first, is clicked to reverse the order and show the South team first. The title will change to show the South team Division name.
As in the non-split standings, click on any of the underlined column headings to sort by that column.
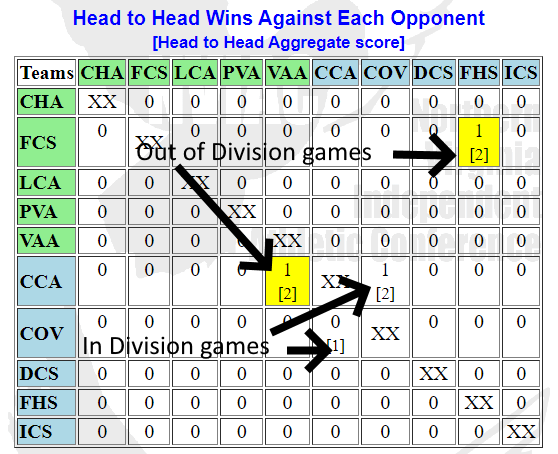
Head-to-Head Wins Grid (Split Divisions):
The Head-to-Head and Aggregate score grid, shows the statistics for all teams, color coded so you can tell the North and South teams, and the cross-Division games are color coded Yellow.
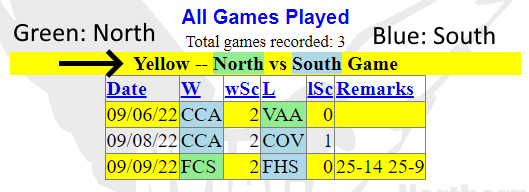
All Games Played Listing:
The All Games Played Listing shows all the games as in the in-Division games, but the teams are color coded to show North and South, and colored Yellow to indicate cross-Division games.
![]()
Multiple Divisions, Same Sport, Gender and Age:
When the AD's decide that there are too many teams for one League Division, they
may split the teams into two League Divisions, A and B, for the season.
Since the League Division designator (2023BBBV) has to be unique for each Division,
The first of the multi-Division will be designated as B1 (for example) and the second
Divison will be B2. This will give each Division a unique code so that teams and scores
can be recorded for each multi-Division.
This works for sports Basketball, Volleyball, Soccer, and Football. Baseball and
Cross Country are not expected to ever be split.
When you assign the multi-Division codes in the season, everything else works the same
as single-Division leagues. The Division names will always show A or B for the respective
multi-Division.
Menu Item: Games/Scores (Manual entry/edit) ( See video training on YouTube.)
Note that the Statistician should rarely have to enter the scores manually. The ADs enter the scores in the online score submission page. Go to the help page for more detail. However, you may need to edit a score entry, or delete duplicates from this page.

The Statistician normally enters games played as they are submitted online. However, sometimes a score needs to be entered or updated manually. This page is where you update, add a new score, enter Volleyball game sets/remarks or delete games.
If a score is reported multiple times by accident
via the online system, it may get into the list of scores. When that
happens, the duplicate will show up with a red background to highlight
the duplicate. Use this screen to delete the duplicate record. NOTE: If
the date, winning team and losing team are identical, it will show up as
a red-highlighted duplicate. If the scores are different, use the date
submitted to determine which is the latest (corrected?) score -- delete
the older, incorrect score. Check with the AD if there's any question.
NOTE: Advise AD's to add a comment if there is a double header game, especially if the scores are identical.
Ties: If a sport allows tie games, enter either team as the winner and the other team as the loser and the tie score for both. The game will show for both teams on the Standings Grid.
Update/Delete/Add Functions
The functions used to maintain these scores include the Update and Delete buttons, as well as the Add button and fields. This same process will be used for other screens, so let's see how they work here:
Update Button:
When you make a change to any item on a line, press the Update button to process the change and save it in the database. It is important to use the correct team names so that the score is properly credited to the right team.
Delete Button:
The Delete button allows you to completely remove a record in any of the update windows. To prevent inadvertent deletion of records, you will be asked to confirm that you want to really delete that record:

Add Button:
At the bottom of the table, the Add function allows you to enter new games or scores. Enter the date in M/D/YY format, followed by the Winning Team abbreviation, followed by the Winning Team Score. Then enter the Losing Team abbreviation followed by the Losing Team Score. When all the information is correct, press the [Enter] key or click the Add button to save the game.

NOTE: You may enter as many future games as you prefer if you leave the scores blank. No games will show in the statistics until the scores have been entered. The fact that a team is entered in the Winning or Losing Team column is unimportant -- none of the teams show until there are actual scores entered. At the time the game is reported, the winning and losing teams will then be put into the correct column along with their scores.
Be sure you enter the teams in the correct columns. The Team in the Winning Team column will be considered the Winning Team, regardless of the scores entered.
Game Remarks (# 5 above): This can be used to add any information about the game. For Volleyball, this is the ideal place to put the sets that make up a complete game. The Game Remarks will appear in two places in the Standings Grid: 1) When you hover the mouse over a game, if there are Game Remarks, those remarks will pop up as a tool tip for the game, and, 2) at the end of the Standings listing, the remarks will appear in parentheses after the game information to which it applies.
Usability Features: There are several usability features to improve the accuracy and ease of game score entry:
Team Code Entry Accuracy: To ensure the accuracy of the teams entered for every game, all teams for the specific Division show in drop down lists (#1 & #3 above) in the Winning Team and Losing Team columns. This eliminates using an incorrect team code for a team and the resulting lost of that game in the statistics.
Score Entry Efficiency: When this page opens, the date for a new game is automatically highlighted (#2 above), since this is the most common use of this page. First, type in the date the game was played (using format m/d/yy) and press the [Tab] key to move to the Winning Team field. Now type the first letter of the Team Code (#3 below) and the team code that starts with that letter will automatically be selected. If you have more than one team starting with the same letter, simply type the first letter repeatedly until the correct Team Code is shown. Then press the [Tab] key to move to the Winning Team Score field. Note that the score field is highlighted allowing you to simply type in the score to replace the <score> entry already in the field. Press the [Tab] key again to move to the Losing Team field and press the first letter of the team code to choose the losing team. Press the [Tab] key to move to the Losing Score field and enter the losing score.

If there are no remarks needed, then press the [Return] key to save the score. It will automatically press the [Add] button and commit the game and scores to the database. You do not have to clear the Remarks field. The program detects the <remarks> entry and saves a blank Remarks field in the database.
If you have remarks (#5 above) -- for example, individual sets for a Volleyball match, the word Forfeit or Scrimmage, etc.), press the [Tab] key to move to the Remarks field and begin typing. As before, when you move into this field, the <remarks> entry is highlighted and erased when you type the first letter of your entry.
Data entry script: To sum up -- enter the scores as rapidly as possible by following this script:
-
The data entry point (cursor) will start in the date field. Enter the date m/d/yy (example: 3/12/09) and press [ TAB]
-
Use the first letter of the winning team to move to that team and press [ TAB]
-
Type the Winning Score in this field and press [ TAB]
-
Again, press the first letter of the losing team to move to that team and press [ TAB]
-
Now enter the losing score and press [ TAB]
-
If there are no remarks, press [ ENTER] to save the new game. The <remarks> entry will not be saved.
-
If there are any remarks about the game (for example individual game scores for a Volleyball game), enter the remarks and press [ ENTER] to save the new game. Pressing [ ENTER] is the equivalent of clicking on the [ Add] button at the end of the line, but it is much faster.
-
The new record will be added and the cursor will return to the Add line for the next score.
![]()
Menu Item: Administration
![]() FAQ Update: The Update FAQ
Page opens the admin page to manage the FAQs for NVIAC:
FAQ Update: The Update FAQ
Page opens the admin page to manage the FAQs for NVIAC:
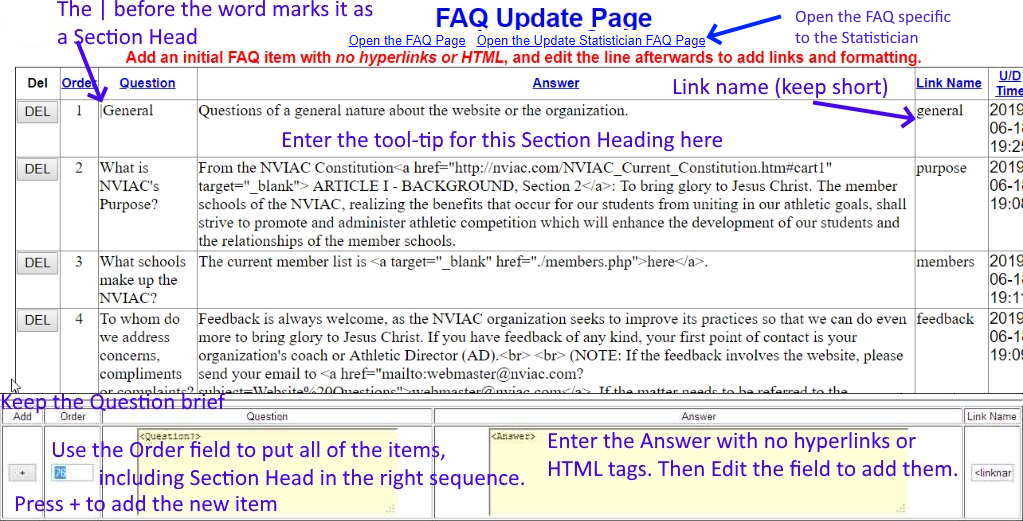
Enter:
-
Order: This is a sequence number you can use to put the questions in the desired order.
-
Question: Make the Question succinct. Section Headings can be added by putting the vertical bar (|) as the first character. |General, for example, will show >>General as the section head.
-
Answer: The answer initially should have NO HTML or special characters. After the FAQ has been saved, you can enter as much detail and custom HTML as desired.
For Section Headings, in the Answer block add an explanation of the section. This explanation will pop up as a tool-tip when the mouse hovers over the heading. -
Link Name: This is the name of the bookmark/hyperlink that will connect the Questions at the top to the Answers at the bottom.
-
U/D Time: This field is not editable -- it gets set to the current time every time you make a change to the FAQ item. An asterisk will be shown for every item that has been updated recently and the time it was updated will show in the body of the Question/Answer.
Log Out: On the bottom of the Admin Menu, this exits the Statistician system.
![]() Upload Stats/Brackets PDF: The upload
Stats/Brackets function. See the full description in the Uploading to the Web Archive below.
Upload Stats/Brackets PDF: The upload
Stats/Brackets function. See the full description in the Uploading to the Web Archive below.
![]() Upload Rosters PDF: The upload Rosters
function. See the full description in the Uploading
to the Web Archive below.
Upload Rosters PDF: The upload Rosters
function. See the full description in the Uploading
to the Web Archive below.
Submenu Item: Site-wide Administration:
Subsubmenu Item: Authorized Statistician System Users:
This provides the Statistician the ability to enter authorized users and assign appropriate privileges, as needed.
The minimum information needed to enter a new user is User Name, Password, Type (privileges), and Full Name. The remainder of the informations is optional, and is only entered for convenience when viewing this page. The detail information is shown on the Members page on the website.

User Name: Enter a simple username for the site user. First intial, last name is usually sufficient. Try to keep the length under 14 characters.
Password: Enter the password chosen for the user, and pass this along to the user in a secure manner (letter, text, phone call -- but not email). When you refresh the page, the encrypted password will show. There is no way to convert the encrypted password back to the plain characters you entered.
Privileges: Each user must be assigned one of three privilege types: Admin, Tourney Director, Athletic Director, or Guest. The Guest privilege should be used with care. The Tourney Director has access to only the Tournament Setup/Modify function on the Statistician Menu. All the other functions are hidden to everyone but the Administrator.
If the Statistician allows other users to enter and update the Tournament Brackets, they should be assigned the Tourney Director privilege.
Full Name: Enter the full name of the user, for reference when you are in this screen.
Email: Enter the email for this user for reference.
Team Code: This is for reference on this page only.
Work Phone/Mobile Phone: This is for reference on this page only.
Update/Delete/Add function:
You can update, delete or add a new user in the same manner as discussed in the Enter Game Scores function, Update/Delete/Add section.
Subsubmenu Item: Statistician Site Details:
This section allows the Statistician to define key details about the League site. These are usually specified by the League Constitution and should not change from season to season. The Statistician details will change upon each succession of the job function to the next Statistician, of course.
The details about the Statistician (name, email, work phone, school, work and cell phones) show in the header of the Standings pages.

Statistics System Configuration: The League Full Name and Acronym entries are shown on Statistics reports in the system. The contact details are shown at the top of the Statistics reports. The League Motto will show at the bottom of the screens.
Site Configuration Preferences:
This system has the flexibility to adapt to a number of
league scoring and display preferences.
Site Scoring Preferences : There are multiple scoring methods available in this system: Scoring methods A, B and C. Note that the method for scoring sports without a possibility of a tie, is standard: Wins / (Wins + Losses). The challenge is to give proper credit for Tie games in sports that allow ties. There are three possible choices in this system:
Scoring Method A: This " ratio" is a simple Wins divided by the sum of Wins and Losses (and Ties if occurring) with an additional sum added based on Ties multiplied by the Tie Multiplier. If Ties are totally disregarded, simply set the Multiplier to 0. If this Multiplier is set to a small value, such as 5 hundredths, then teams tied with identical Win/Loss records, will be ranked based on the most Tie games.
Scoring Method B: This " Total Points score" weights Wins, Losses and Ties to rank teams, giving credit for all games played. The weighting can be adjusted to accommodate any league's preferences. Note that the -2 multiplier for Losses provides a way to differentiate between multiple teams who have won no games, but lost differing numbers of games. The Win, Loss and Tie Multipliers often only apply to Soccer.
Scoring Method C: This is similar to Method A but is a simple ratio of the total Wins divided by the sum of Wins, Losses and Ties. Identical ratios will still need to be resolved by League rules (Head-to-Head, coin toss, etc.).
The Percentage of Teams each team must play
ensures that each team plays the minimum number of games to allow a fair
representation for Seeding purposes. If any team fails to play the
minimum percentage of teams (not games), that team will be Seeded
according in the League rules (often seeded last).
Standings Display options: The display elements can be selected according to League preferences. Since the Statistics System ensures accuracy in the Standings Grid, some leagues may opt to eliminate Winning and Losing team designations since the winning team is shown at the left of the row containing the score and the losing team is shown at the top of the column containing the score. There are four elements that can comprise the data shown in the Standings Grid: Winning Team, Losing Team, Score, and Date. Check the desired elements and click the Save Site Definitions button at the bottom of the grid. The display below the check boxes will illustrate the elements that have been chosen and their relative positions.
Note: For obvious reason, at least one checkbox has to be selected. If all checkboxes are unchecked, the Winning-Losing Score will be automatically selected and saved.
Minimum Teams for Tournament: The Constitution and Procedure Manual specified the minimum teams required to have a tournament at the end of the season. If the governing document changes that number enter the new minimum number of teams required in this block and press the Save Site Definitions button.
Subsubmenu Item: Member Schools of the League:
Schools come and go in most leagues and some leagues remain year after year. This function allows the Statistician to update the teams as the membership changes. When a school leaves the league, it should remain in the list of Schools so that previous Statistics will continue to show their contribution to that season.
This information is used to populate the Members page, which contains all of the [L]eague coded teams.
There is a link below the header to go to the Image Upload page. Notice that when the AD pictures and Team/School icons have been correctly uploaded, you'll see them under the Team Name
NOTE: It is important to never change the Team Codes -- they act as the key to which all game scores are attached.

The fields have a placeholder name in the field, that disappears when the first letter of an entry is typed. This helps to identify the fields without having to scroll to the titles at the top of each section.
Every field has a pop-up detailed explanation when the cursor is hovered over the field.
These two functions make it easier to identify the fields and enter the required evidence.
To complete a Team/School record, enter the following information. The information included for each team is used to compose the Member's page, so pay special attention to the [L]eague entries.
-
Team Code - three or four characters. If a combined team, enter the two codes as one: AFAHFS, ISAHHS, etc., max or six characters, if at all possible, to make the Standings grid display correctly. If a school/team has multiple teams for a given sport, use the Team Code followed by a differentiator (Gold or Blue -- GLD/BLU or 1 /2, for example) to indicate the separate teams.
NOTE: Use the Team Code WEBM and a Status Code of W to enter details about the current Webmaster. -
Team name - Enter the full name of the team. For combined teams, keep the name short -- AFA & HHS Combined or AFA Team Afor example.
-
Mailing address of the team (Street, City, ST & ZIP)
-
Status Codes: [ L] - an active team in the League; [ C] - a team made up of combined teams or multiple teams for the same school/team; [ N] - a Non-league team (not used); [ I] - former team that is now Inactive; W to enter details about the current Webmaster.
NOTE: When a school/team fields multiple teams, you can enter them as Members for game play recording, but not have them show up as additonal members on the Members page. The same process is used for two teams who combine to play a season. For a school/team with multiple teams, enter new records as if it were a new team, using a Team Code of >team code=""<-1 OR -A, as desired. There will be a new, duplicate record for each of the teams. FHS-A, or FHS-B, for example. The new Member records MUST have Status Codes of C. This makes the "member" available for recording scores, but the duplicate record does NOT appear on the Members Page. The duplicate record, in additon to the FHS-A team code, must also have a Team Name of Fairfax Home School Team A, etc., and the AD Name and Email address. These four fields MUST be present on the team records. -
Athletic Director(s) (AD) Enter as Firstname <space> Lastname (There is a spot for the second AD.)
-
AD email address(s) (There is a spot for the second AD.)
-
Team Website - the main website/homepage for the School/Team
-
Play Locations -- where the sports are played for home games. If there are different locations for different sports, enter each sport and the location, using Sport label, followed by a hyperlink to the map surrounding the name of the facility (see example above).
-
Team Scores - The webpage where the Team Scores are reported (Enter only the URL of the webpage -- if a URL is included, it will show as a link under the word Scores, otherwise it will be blank)
-
Team Schedules - webpage where the sports schedules are published (if a URL is included, it will show as a link under the word Schedule, otherwise it will be blank)
-
Map/Directions - webpage which contains the directions to the school/team locations. Use HTML to show the hyperlink URL surrounding the word Map (or any other appropriate label).
-
Work Phone # - enter the AD's work phone
-
Work Fax # - enter the AD's work fax number, if any
-
Cell Phone # - enter the AD's cell phone number. This number never shows on the public Members page. A special code has to be entered to show the list specifically for AD's. (There is a spot for the second AD's cell phone, as well.)
-
NVIAC Office Held - This is usually blank, but when an AD is an NVIAC office holder, enter their specific title here: Minimally, include: President, Vice President, Secretary, Treasurer, and Statistician. By entering the title correctly, the office holders will show automatically on the About page. When office holders change, the About page will automatically be correct, without having to do any web editing. The Office Held will apply to the primary AD only.
Special Members Page Features exclusively for Athletic Directors
A feature of the NVIAC Member page is the ability to
provide Athletic Directors (AD's) additional information about the other
NVIAC AD's.
When you add ?with=cell to the end of the regular
Members page link (a link NOT found anywhere on the web), this new page:
http://www.nviac.com/members.php?with=cell
provides a detailed AD information page, which includes extras, such as:
1. AD Cell phone(s)
2. AD Home Number(s) (if available)
3. AD picture(s)
4. A Miscellaneous field for Team/School info only available to other
AD's, and,
5. Special Links that are available only to AD's.
a. Open a list of all the Current All-League players assigned for your team
b. Open the Submit All-League page for your team
c. Open the Roster submission
page
The private contact page can be real boon to all AD's. It gives you
access to contact information; provides a picture of the AD to help new
members learn their colleagues; and it is available from any Internet
device, smartphone, etc.
Note that in addition to the Team logo, you will see a picture of the AD below. If there are two AD's, then both pictures should be shown. If there is no picture available, you'll see a blank No Picture logo. Hovering over either the logo or picture shows that you can go to the website by clicking on the logo/AD pic.
Preparing and uploading an AD picture
The following specifications dictate how to get an AD picture to show on the Members page:
-
The picture needs to be a head shot with a simple background, for best recognition capabilities
-
It needs to be named <team code in CAPS>.png. Examples: AFA.png, CCS.png, FHS.png, HHS.png, etc.
-
It needs to be sized to 100px by 100px, to match the other photos and the size of the logo
-
It needs to be uploaded to the /images directory on the web.
-
For Schools/Teams with no AD picture available, copy the No Photo Available image and give it the team/school name as shown in 2 above.
Update/Delete/Add function:
You can update, delete or add a new school/team in the same manner as discussed in the Enter Game Scores function, Update/Delete/Add section.
Submenu Item: Seasonal League Division Management:
Subsubmenu Item: 1-Create Sports Divisions for the Season: ( See video training on YouTube.)
NOTE: The scores reporting system ( See the Scores Help System) shows every season team which has a status of either [S]tandings only, or [B]oth Standings and tournament. Leave the Active status to either of these values until ALL scores have been reported for the very last Tournament game. Otherwise, AD's may not be able to report Tournament Scores because their team does not show up in the Divisions dropdown list.
There may be seasons when there are Split Divisions, designated North and South.
Please click on this line to go to the Division Naming guidance

Division Designation: The Division designation is made up of the Year, the Sport, The Gender, and the Age. When you enter a new Division, leave the Division Name as is, and the Division Full Name will automatically be created and added to the record. The Division Comment block is used primarily to indicate how a Win/Loss tie was resolved for the division, to allow the proper assignment of the Official Seeds. For the Division year, assign the year in which the tournament happens. This only affects Basketball, which starts in one year and finishes in the next.
Sort Order: The Divisions need to have the sports grouped. Use the Sort Order number to make sure all the same sport appear together, and the order of the Varsity, Middle School, etc., Divisions are the same.
# Teams: This shows the current number of teams currently assigned to this Division. The number of teams affect whether a tournament is held, or if a Third Place trophy is awarded.
+Teams link: This allows you to jump directly to the Assign Teams to Divisions page -- for this Division, so you can enter the Teams immediately, without have to go back to the main menu.
Active Status: The Statistician can add a Division before the season starts. Since there will be no data for either the Standings Grid or the Tournament Brackets, set the Active Status for the Division to N for Not Active. The Active Status code determines if the Division appears only on the Current Standings page (Active Code S), only on the Tournament page (Code T) or on both Standings and Tournament pages (Active Code B).
The Current Standings and Current Tournament Brackets are automatically generated when the user chooses the Events-Standings or Events-Tourney Brackets selection from the Main Menu. Only Divisions which have a status of S or B will be included when the Events-Standings page is chosen. Only Division which have a status of T or B will be included when the Events-Tourney Brackets page is chosen. After the Season, the Active Code determines if the Division shows in the History pages.
When play starts, the Statistician has enought information to create a placeholder Tournament Bracket, based on the number of teams in the Division, so set the Active Status to B for Active for Both Standings and Tournaments. The only exception would be if the the Division has too few teams for a Tournament, so show only the Standings and no Tournament Bracket by setting the Active Status to S for Standings only. For Cross Cournty, however, there are no current Standings maintained, so Set the Active Status to T to show only the Division in the Current Tournament list.
.
After the season is over, you can remove the Division from the Current lists, and show them in the History pages, by setting Active Status to PDF codes. For Divisions that had both a Standings page and a Tournament page, set the Active Status to H to show Bot[H]. If there is only a Standings page, set the Active Status to A for St[A]ndings. To show only the Tournament page, set the Active Status to O for T[O]urnaments.
| Menus: | Current | Only in |
| Show below in ========> | & History | History |
| Standings (only) | S | A |
| Tournaments (only) | T | O |
| Both Standings & Tournaments | B | H |
| Not Active | N | N |
Update/Delete/Add function:
You can update, delete or add a new Division in the same manner as discussed in the Enter Game Scores function, Update/Delete/Add section.
Assigning Active Division Status for North/South Divisions
Active Status Codes
The Active status of each Division determines where the Division will show in the Standings page, the Tournaments page, and in other screens, such as the SendScore page. Here are the po ssible status codes:
[N]ot Active
During the season use:
[S] for Divisions that have Standings, but no Tournament
(Divisions with less than four teams, North and South Divisions, for example)
[T] for Divisions that have ONLY a Tournaments (Cross Country,
and North/South combined teams for Tournament, for example)
[B] for Divisons that have both Standings AND Tournaments (the
majority of the seasons)
When the season is complete and the Standings and Tournament pages are saved
as PDF's and uploaded:
[A] for Divisions (PDF) that have Standings, but no
Tournament (Divisions with less than four teams, North and South Divisions, for
example)
[O] for Divisions (PDF) that have ONLY a Tournaments
(Cross Country, and North/South combined teams for Tournament, for example)
[H] for Divisions (PDF) with both Standings AND Tournaments
(the majority of the seasons) .
North/South Divisions
When Divisions are split into North and South Divisions, the individual North and South Divisions do not have Tournaments. The Tournament is between the all the teams in both North and South Divisions. To make the Right Division show up on the respective Standings and Tournaments pages. The North and South Divisions have to show ONLY on the Standings list (and the Submit Scores list) and the combined teams Tournament has to show ONLY on the Tournament lists.
- Set the North/South Divisions as [S]tandings only. When the Standings lists (Current and History) are shown, only the N/S Divisions will be shown separately
- Create a (Tournament Only) Division with all of the North and South Teams. Set the Division to Tournament ONLY.
Timing
The Send Score page (sendscore.php) will show Divisions that are marked as Standings, Both or Tournament. If the Active Codes are set correctly, only the North and South Divisions will show during the Season, so scores can be correcly recorded only against North or South teams.
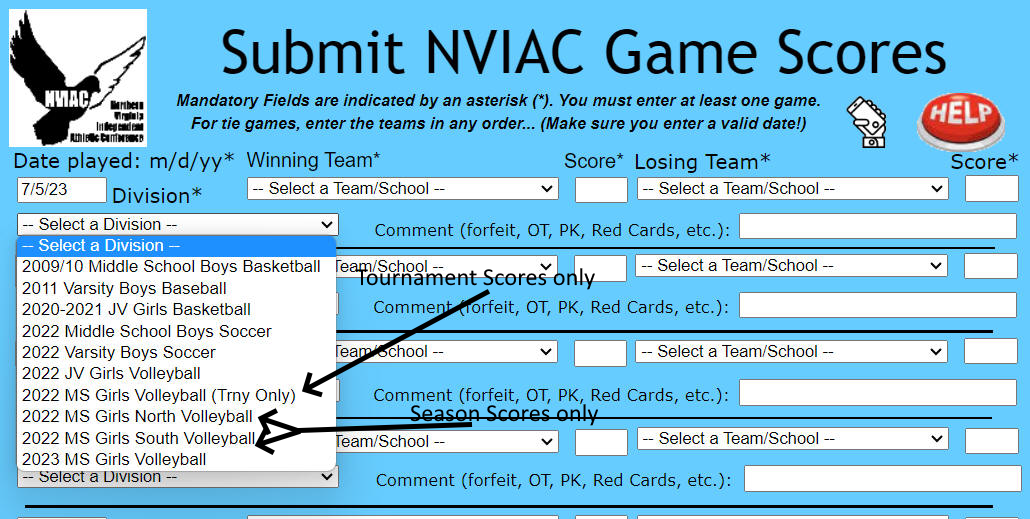
Therefore, during the season and before the start of the Tournament Begin date:
1. Set the North and South Divisions to [S] for Standings Only, and,
2. Set the Trny Only Division to Tournament Only PDF = "O"
During the season, the SendScore page will ONLY show the North and South Season game choices, so that season scores can be reported only against the season North and South teams.
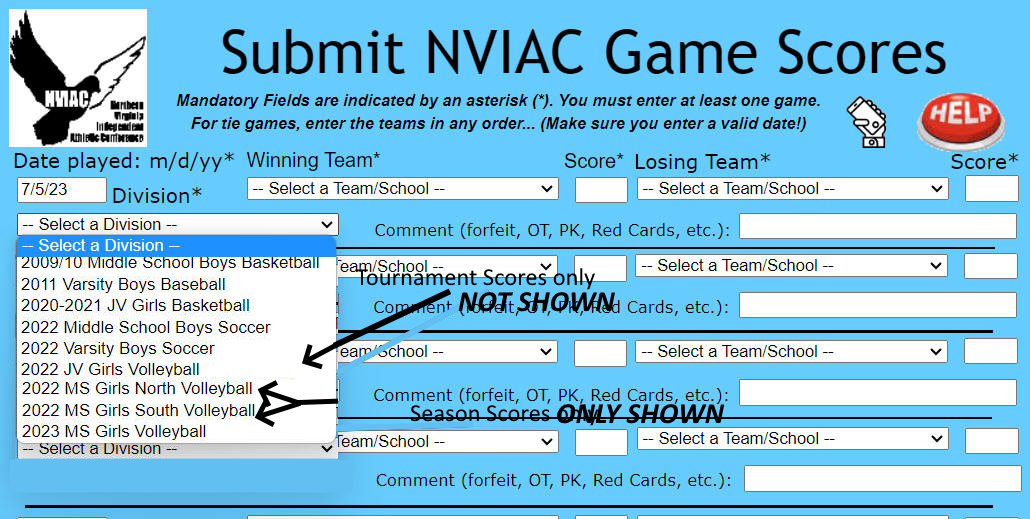
Then, during the tournament after the start of the Tournament Begin date:
1. Set the North and South to Standings only = A. and
2. Set the Trny Only Division to Tournament = T
During the Tournament, the North and South Divisions will NOT show in the Send Scores page, and only the Tournament will show.
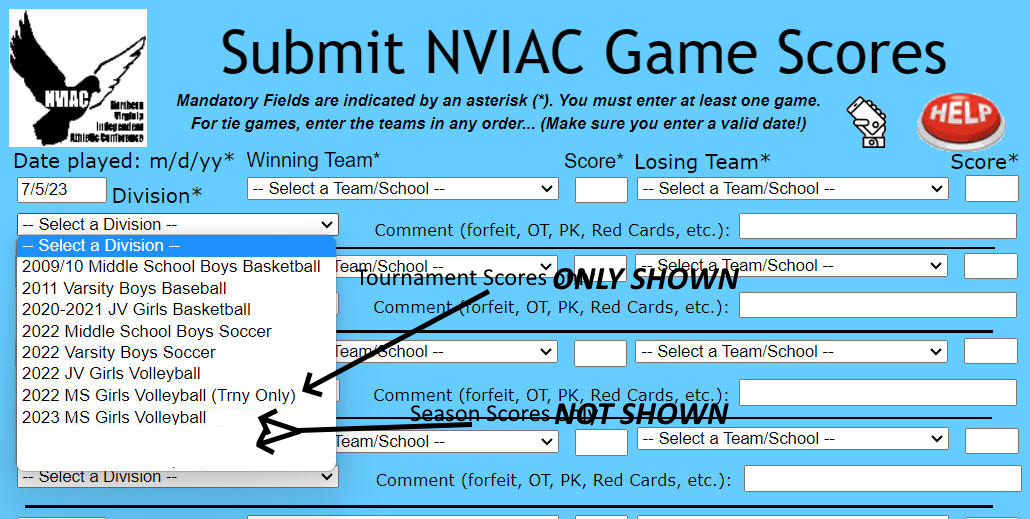
Subsubmenu Item: 2-Assign Teams to a Division for a Season/Sport: ( See video training on YouTube.)
After the League Divisions have been created, the Statistician must then assign the League's teams to the Division. Since all schools don't have all sports teams, this step is important to make sure all schools/teams are assigned to the appropriate Division.
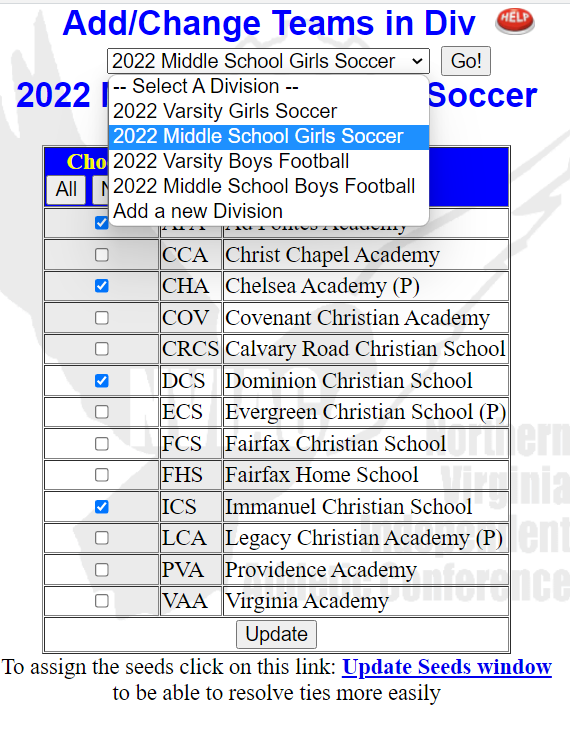
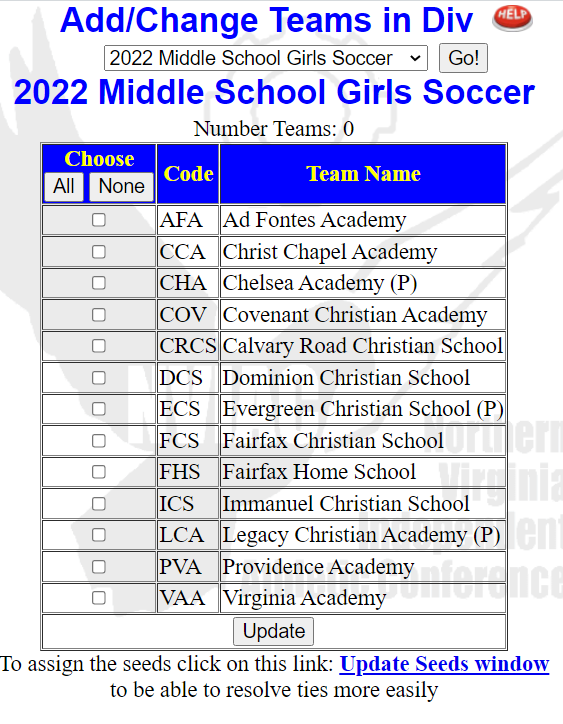 The initial task is to add the
schools that have declared they will have a teams for this Division.
After you have chosen a Division, click on the checkbox to assign all teams
that have declared for this divisions.
When you press the Update button after checking or unchecking teams, you'll see a confirmation of a successful update:
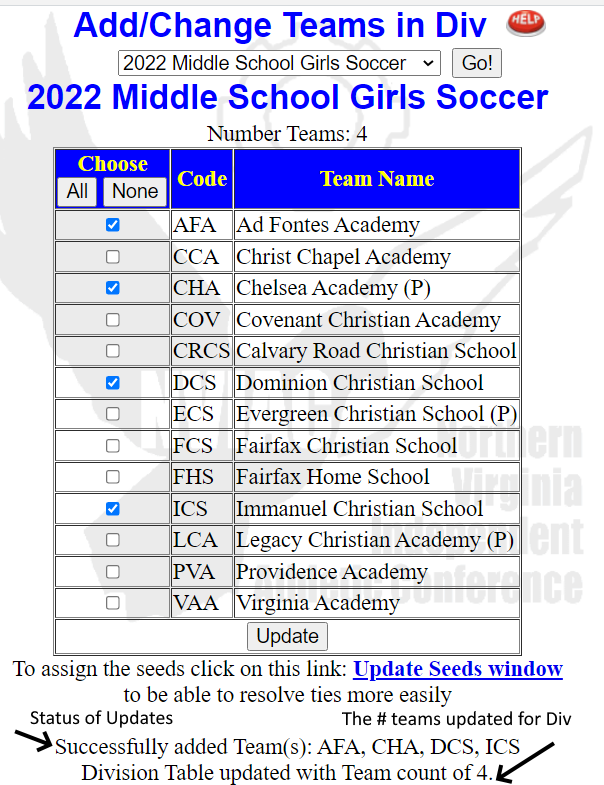
Multiple Teams for one School, or Two Teams combined for the season. When there are multiple teams from the same school, go to the Update League Member/Teams and add two new entries. For example, add CCA1 and CCA2, with CCS Team 1 and CCA Team 2 as the names. If there are two teams that combine for the season, create a new Member/Team that is a combination of the two Team Codes, and a name that reflects both teams participating. For the multiple teams, or the combined teams, set the Status to C so these new teams will show when you go to Assign Teams to the Division.
Official Seed Assignment. While the Won/Loss ratio most often determines the final Seed assignments, each League has specified how to break ties that result. The Official Seed column on this screen is used at the end of the season to official assign the Seed for each team, in preparation for the Tournament Brackets. If there are no Win/Loss ratio ties, then the teams can be assigned official seeds based on the values that result from the final standings.
For ease of assigning the Seeds, the Update Seeds page contains the same information that the Standings page contains. This allows the Statistician to use the Head-to-Head table to determing how to break ties.
The Seed column is editable in place. Click on a the seed cell to open an edit-in-place window. Assign or change the official seed and press the Save button. The seed will be updated.
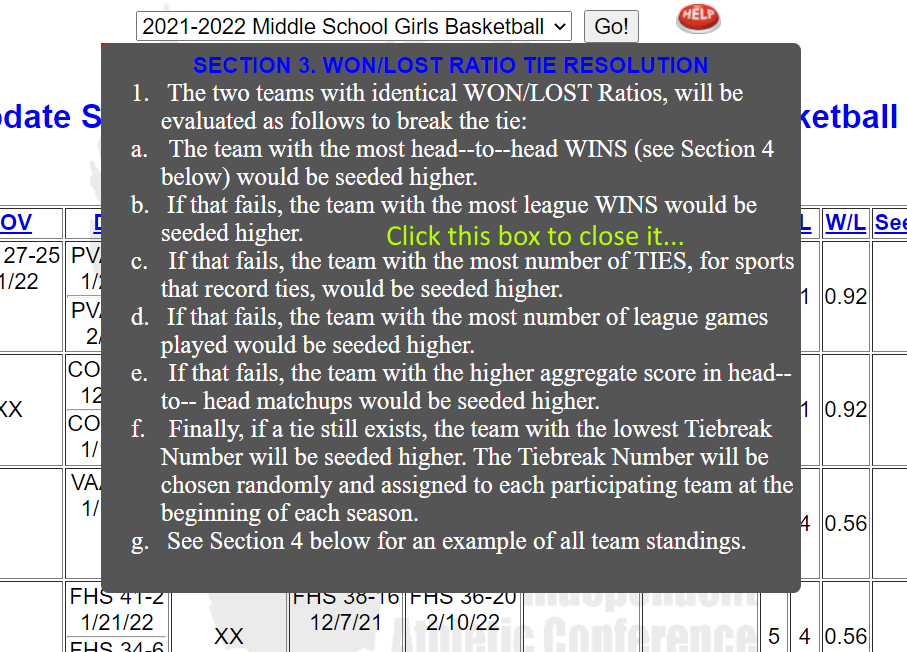
There is a link at the top of the page to pop up the Standings and Rules from the Procecures Manual.
If there's a tie between two teams have identical records, the final tie breaker is the number assigned to each team at the beginning of the season. Use the numbers in the TieBk column to finally resolve these types of ties.
Click the red-boxed link to pop up the rules. Click it again to dismiss it.
The Aggregate Head to Head scores are shown on the Head to Head grid, to make it easier to resolve a tie situation by choosing the team with the higher aggragate score.
Managing Tiebreak Numbers
At the beginning of each season, a number will be randomly assigned to each team to help with resolving ties at the end of the season. The last step in tie resolution when both teams are identical in every statistic, is to choose the team with the higher Tiebreaker Number.
The Statistician will receive the numbers from the Governing Body and add them to the Teams database using the Manage Team Tiebreak Number page:
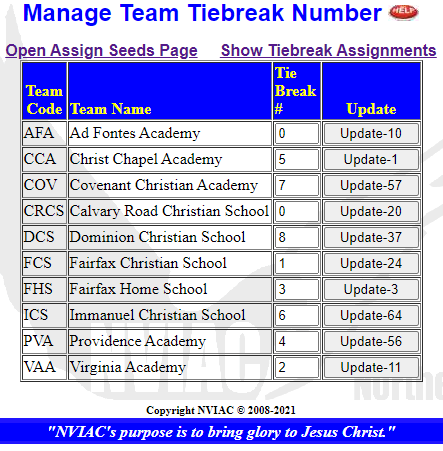
Each season the numbers will be re-assigned and this page will allow the Statistician to record them.
Update/Delete/Add function:
You can update, delete or add a new Team to a Division in the same manner as discussed in the Enter Game Scores function, Update/Delete/Add section.
Subsubmenu Item: 3-Update Scores for Games Played in a Division
This is another way to get to the Games/Scores page. <- Click the link to go to the Games/Scores Section.
![]()
Menu Item: Tournament Brackets
Each season wraps up with a Tournament to determine the Division Winners. The Tournament Brackets are created, based on how each team played the season and the resulting Official Seed assigned after any ties have been adjudicated. The Tournament Brackets function allows the Statistician or Tournament Director to create the brackets simply and quickly, provide guidance to teams, and, most importantly, publish this information simply and quickly to all parties.
Note that the Statistician can assign separate Tournament Directors to enter the Tournament Brackets at the end of the season.
 Note that if a
Tournament Director logs in to the Statistician System, the menu will
change from Statistician to Tourney Director.

Note that the Tournament Director Administration page is abbreviated to prevent anyone but the Statistician from accessing the entire range of the Statistics System. Each choice has a help button specific to that function, as well as access to the main help button, which opens this file you are reading.
Submenu Item: Setup/Modify:
This allows the Bracket Creator (which will be the Statistician, or the authorized Tournament Director) to generate the end-of-season Playoff Brackets for each Division.
NOTE: The first time a Tournament Bracket is opened, a database record
is created to save the specific Division. You'll know this has happened,
because this message will appear at the top of the bracket:
When you click the line, the same tournament bracket will open, but you'll now see the Game Labels populated, to be updated to correspond to the actual games to be played.
Tournament Brackets may be created at any time after the creation of the League Division and the assignment of teams. Until Official Seeds are assigned to each team, placeholders (Seed 1, Seed 2...Seed N) can be used to fill out the bracket to identify eventual Official Seeds who will be opposing each other.
The Tournament Bracket is based on a single-elimination bracket, with a consolation game for the losing Semi-Final Teams. In addition, there is a place to document the winner of the Best Christlike Character Award at the end of the season
NOTE: Please do not post the Best Christlike Character Award winner on the bracket until the end of the tournament, when the Winners have been decided. This ensures that the Best Christlike Character Award winner is honored at the same time as the Tournament winners.
NOTE: It is imperative that the bracket be created based on the number of teams in the Division. If nine teams played during the season, but only five are playing in the tournament, you MUST create a bracket as it there are only five teams in the Division. This means that the "Play-In" game that would normally be in the "Play-In" column for nine teams, must be in the Round 1 column. Work back from the Finals column to ensure that the Tournament Grid is populated correctly.
Team placement approach: The bracket is labeled with Play-In, Round 1, Semi-Final and Finals. This is the format when there are over eight teams. See this 11-game example:
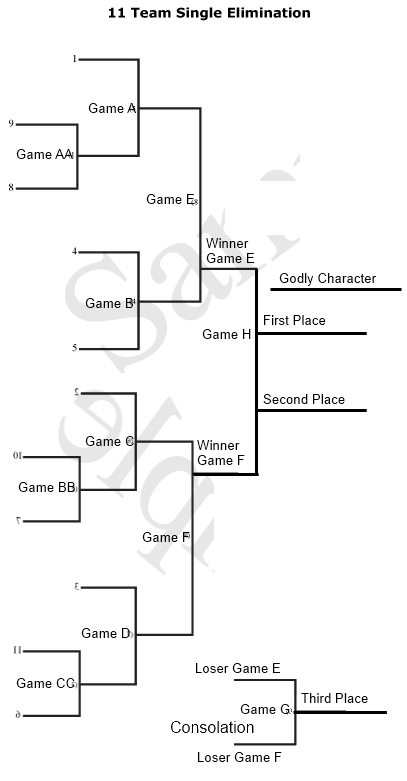
(This bracket create page supports 1 to 11 teams. If there are twelve or more teams, it might be better to set up multiple divisions.)
Click the [ Click to show bracket examples for other than 8 teams] link to show examples of brackets for 8 to 11 teams. As you get to 9, 10, and 11 teams, please use the appropriate Play-In section.
However, as the number of teams drops below seven games, the brackets need to shift to the right to accommodate the fewer teams. For example, if you have only six teams, the Play-In games need to be show in Round 1, with the Round 1 games shown in the Semi-Finals column, and the Finals/Consolation in their normal places.
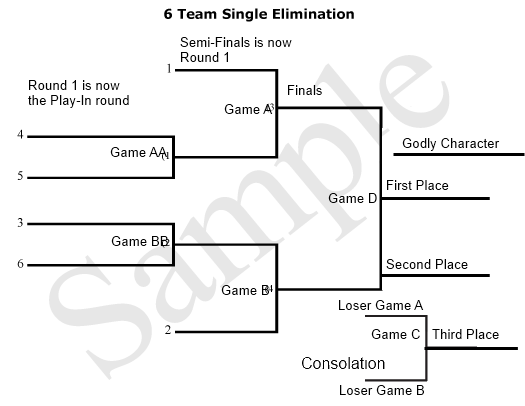
Completing the Tournament Bracket: The bracket creation/update screen contains every possible game pair, to allow the Statistician to create any bracket, for any number of teams.
IMPORTANT: The Statistican determines which game pairs appear in the final grid by the labels which are included in the bracket creation/update grid.
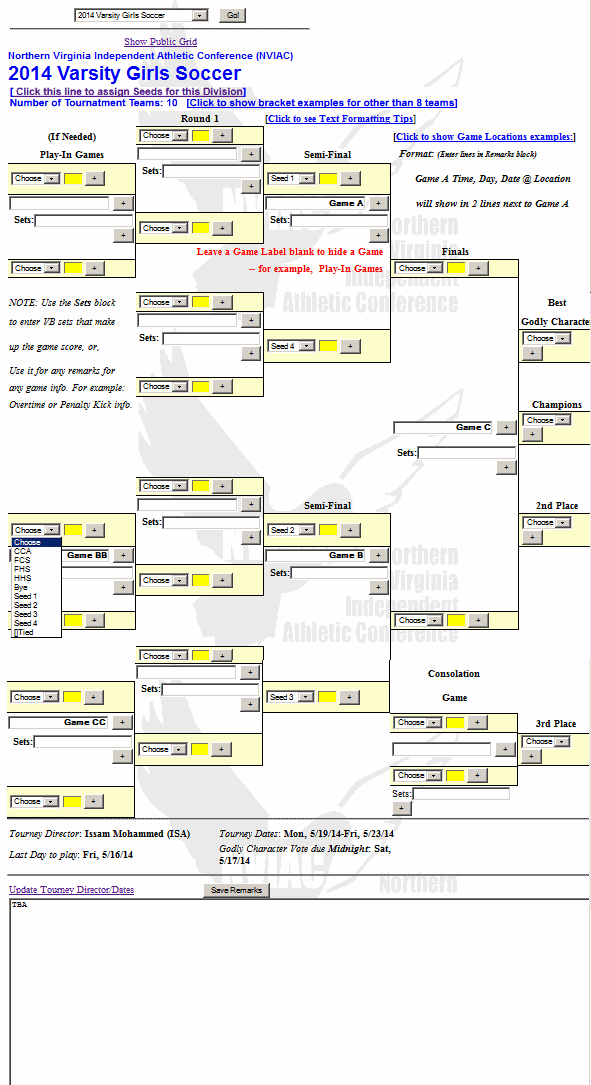
Bracket Size: The bracket is designed
for Divisions which have as many as 11 teams. The Statistician will
determine which of the team pairs (games) will show by the games that
have labels. Games with no labels will not be shown when the tournament
grid is displayed. When more than four teams are playing, but the
decision is made to not have a Consolation Game, leave that label blank to
suppress it on the Tournament Grid.
![]() Game Names/Designations: The
name of the individual game in any of the tiers can be changed. If there
are only two played games in the first round, the two teams that get a
Bye will be shown but there is usually no label give to the game. If you
leave a label blank, that game pair will not be
shown on the grid and you can enter the Team with a Bye in the next
Round. This editable label feature lets the Tournament
Director name all of the games exactly as desired.
Game Names/Designations: The
name of the individual game in any of the tiers can be changed. If there
are only two played games in the first round, the two teams that get a
Bye will be shown but there is usually no label give to the game. If you
leave a label blank, that game pair will not be
shown on the grid and you can enter the Team with a Bye in the next
Round. This editable label feature lets the Tournament
Director name all of the games exactly as desired.
Enter the game name and press the [+] sign to save. The
button will temporarily show [-] as the name is being saved and will
return to the [+] sign when the name has been saved. Just delete the
game labels where there is no game to be played and press the [+] save
button. Make sure all characters, including blanks, have
been deleted when you save the label.
Play-in Options: The Tournament Director will decide where the seeded teams will appear and who will play whom for the play-in spots. For example, Seed 8 may play Seed 9, Seed 7 may play Seed 10 and Seed 6 may play Seed 11 -- the winners will then be placed in the Seed 6 thru 8 positions. The number of teams in the Division will dictate how many (if any) play-in games show up on the Create Bracket page. You can suppress any unneeded game pairs by leaving that game pair label blank.
Creating a Blank Tournament Bracket. Any time after the Division has been created and teams assigned, you can create the Tournament Bracket for that Division. Until the Official Seeds have been assigned, use the Seed 1, Seed 2, etc., team names instead of actual teams. The Tournament Bracket can be published with dates and times for games well before the Official Seeds have been assigned and the actual teams entered into the bracket.
 Choosing
Seeds: For every position, there is a drop-down which shows
all of the teams in this Division, with their Official
Seed designations indicated. This ensures that the proper
Seeds are paired. A common pairing is for Seed 1 to play Seed 8, 2-7,
3-6, and 4-5. When the desired Seed is shown in the window, press the
[+] key to save the selection.
NOTE: If known, you should assign the Official Seed values for each team -- there is a link at the top of this page to go directly to assign Official Seeds. If there Official Seeds are unknown, populate each team pairs with the appropriate Seed pairs: Seed 1 vs Seed 8, for example.
If you have assigned specific, seeded teams and the seeding changes, you will need to return to the Tournament Brackets page and re-assign the teams to correct the seeding matchups.
Assigning Round Win/Loss Scores: When a tournament game is played, the game results can be shown next to each team. Enter the team's score for the round and press the [+] button to save the score. While a team score is not required, it provides a confirmation that the proper team has advanced to the next round.
Notice that when you press the [+] button to save the button label changes to a [-] to show that the values are being saved. When the save is complete, the button label changes back to the [+].
 Remarks/Comments:
The location and times of games, contact names and numbers, referee information and other information is often needed for the Division players, Coaches, parents and officials.
Any information that is needed can be entered into the Remarks block at the end of the brackets. When the Bracket is printed, this information can be printed at the same time, to provide information for all interested parties.
As you will see in the next section, you can choose to include or omit the Remarks section when you publish the Bracket.
Note that when you make any changes to the Remarks block, the words Not Saved show next to the Save Remarks button to remind you to save before exiting:

When you press the Save Remarks button, the status will change to Saving... and when the save is complete, the status will change to Saved.
Note: there is help a click away for adding color to the items in the grid and in adding locations in the remarks that show next to the games in the grid. Click on the links to get a new window that opens with details. The details are shown in the following paragraphs.
In the public Tournament Bracket, click the Seeds link at the top of the page to show the official seed assigned to each team.
Cross Country Tournament Documents
The Cross Country Sport does not have the typical season game reporting, team seeding, and Tournament Bracket tracking. At the end of the Cross Country season, the Tournament Director will accumulate the results of the Tournament(s) and send a summary document (with as detail as desired) and send it to the Statistician (stats@nviac.com). The document can be in any format -- the Statistician will convert it to PDF, create a Division for the year and upload it to the /stats/pdfs directory.
Tournament Directors and Date data:
Every tournament has a specific Tournament Director (or two), planned dates of the tournament, last day to play a season game, and the date by which the Best Christlike Character team vote has to be submitted. There may be more information, as well, such as locations or other details of the tournament.
When the Tournament Director or the Statistician opens the Update Tourney Directors and Data option, they have the opportunity to update this information. There's a link on the Tournament Grid update page that will allow them to open this funtion if anything needs to be changed.
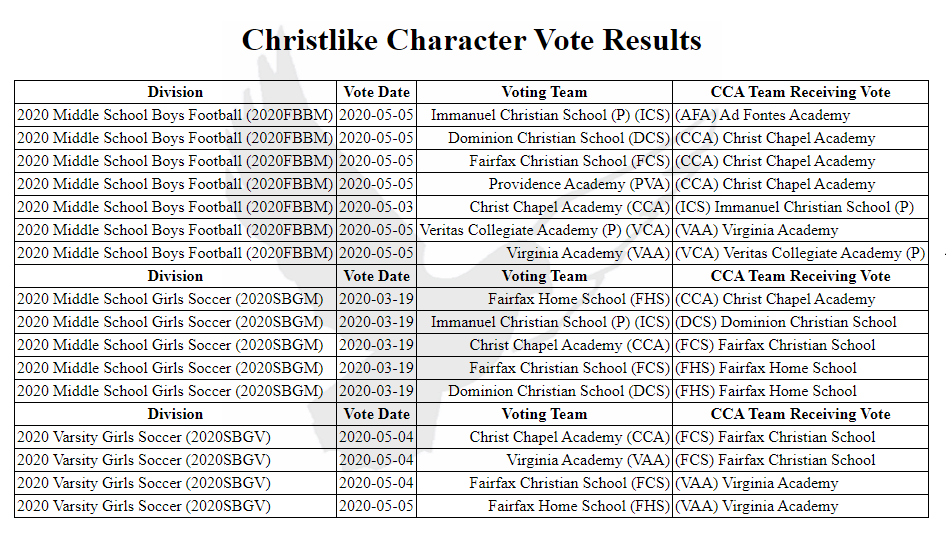
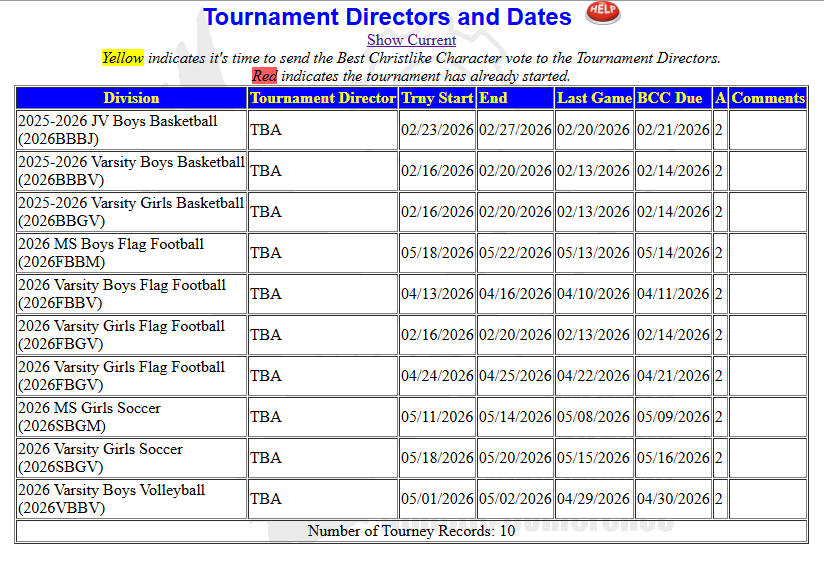
As you can see from the figure below, the Tournament Details (Director, Dates, etc.) table include all of the pertinent Tournament data.
This shows the current information recorded for all Division tournaments in a format that can be saved or printed and forwarded to all AD's:
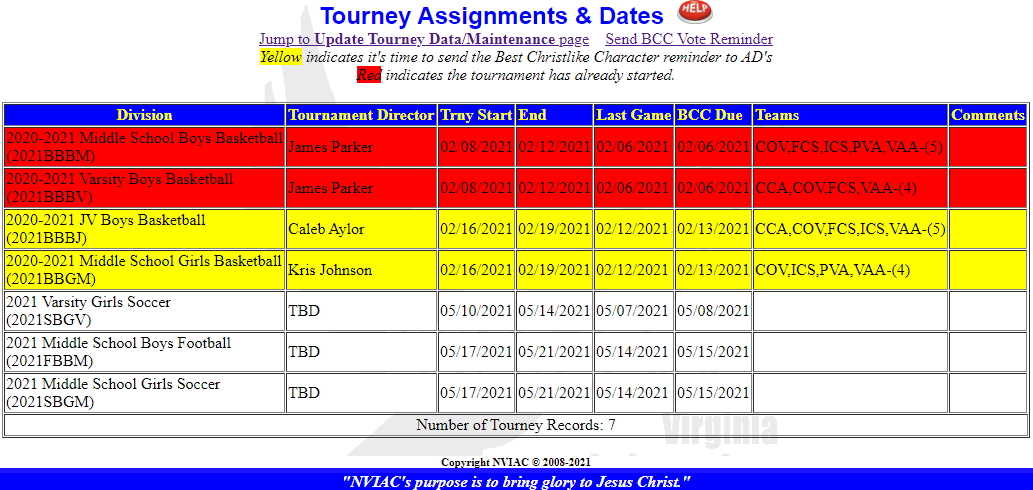
The rows will be color coded to show when it's time to send the Best Christlike Character vote and when it is past the start of the tournament.
NEW FEATURE: Show Declarations
The link, Show Declarations, opens the Declarations page, showing current assignments for future Seasons:
Update:
This opens the Tournament Data Maintenance page:
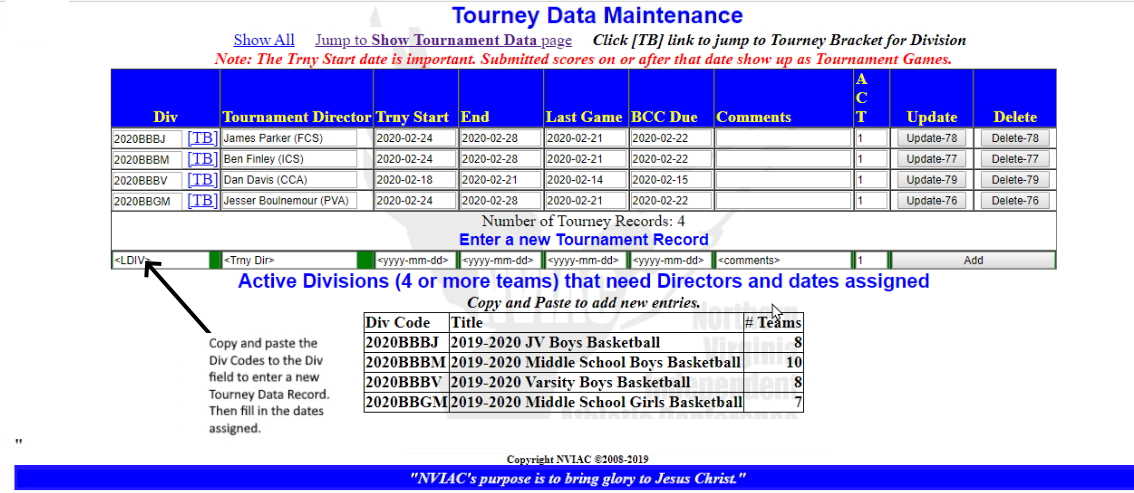
As the note on the page says, the Trny Start date is very important. The Submitted Scores process evaluates the incoming scores and compares the date to the date of the Tournament Start. It flags the game as a Tournament Game if the date is after the Tournament Start date.
This provides the opportunity of updating the information of each tournament as reported, or adding new records for new tournaments. When the season is complete, mark the record as inactive by inserting a zero (0) in the ACT (active record) column.
For entry convenience, all of the active Divisions (with the minimum number of Division teams to qualify for a tournament) are shown in the box at the bottom. Simply copy and paste each Division to create a record for every Division.
NEW FEATURE: Declaration Managment
When you click on the Show Declarations link, the currently assigned, pre-season Declaration Divisions will be shown:
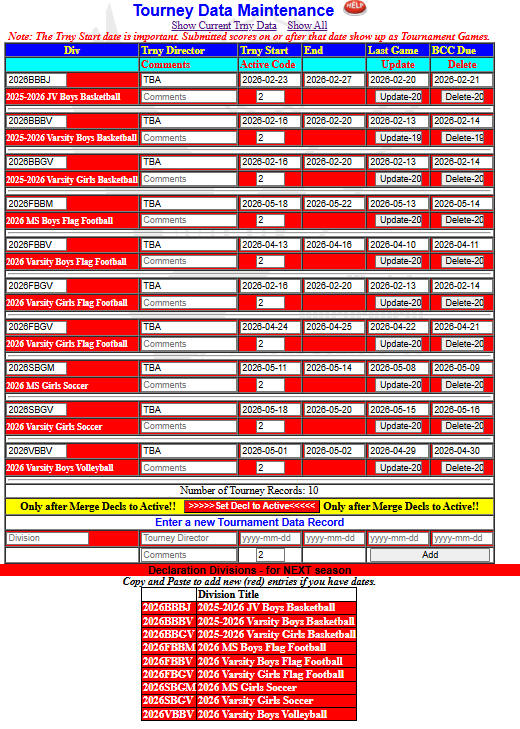
The Declarations for the next season will be entered as soon as the current season is started. This will give the AD's all season to decide their intentions for the next season, and, at least by the next AD Meeting, they'll need to submit their Declarations for each of the Divisions.
Declaration Divisions are indicated by setting the Active code to D when the Divsion is created.
Date, Time and
Location information showing next to games in Grid: The game
locations information is shown at the bottom of the grid, necessitating
looking first at one location then the next to get the full information
about the game. The Tournament Grid system shows game information right
next to the game in the grid. You must, however, format the game
information in the Remarks block in a specific way for it to be
recognized and shown in the Grid.
| Here's how to format the data: Enter the game play locations in the Remarks block in the indicated format -- the directions will automatically show next to the correct game up in the Tournament Grid: |
| In the Remarks block enter: | See
this in the Tournament Grid: |
||||||||||
| Game D Tuesday 4:00
court 3 @ Hoops Magic |
|
||||||||||
|
Game B 11/24, Wednesday
@ Hoops Magic Court 6 |
|
- The game location line in the Remarks block must begin with Game X (where X is the Game - AA, A, B, C, etc.) to identify the line as a game location. (Game AA, Game B, etc.)
- The line will be split into two lines wherever you put the @ sign. Try to make both lines close to the same length.
- The Game letter will show at the beginning of the line to assure visitors that the game information is attached to the correct game.
- It doesn't matter if you rename the games (i.e., swap the labels for Game A and B). The location will always shown next to the proper game.
- You can enter anything in the Remarks grid -- only the lines with Game X at the beginning will bet shown next to the correct game.
[ Click here for an example in PDF format]
Adding Location Links to the Grid
-
Play locations can be added as links to the Location information that shows in the grid, to allow visitors to click on a link to go directly to a map showing the field or facility.
-
In the Remarks block, surround the name of the play location with a hyperlink directive. For example, the South Run soccer fields are shown on the Google Map referenced by this URL:
-
Convert the link to a short URL (using http://tinyurl.com. for example). Paste the long URL from the Google Maps page into the Enter a long URL to make tiny field:
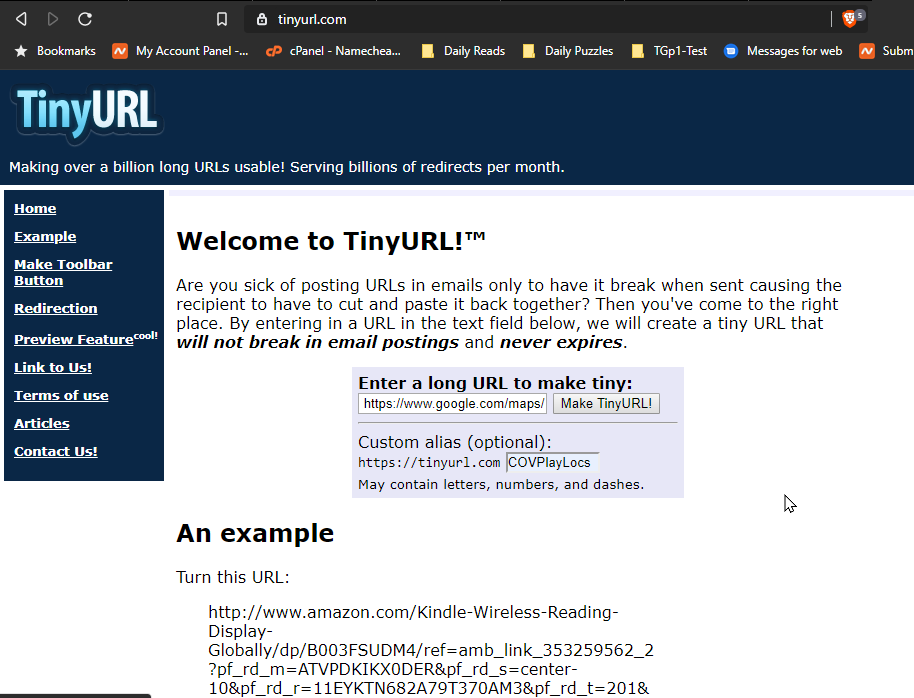
The page shown when the tiny URL is created is: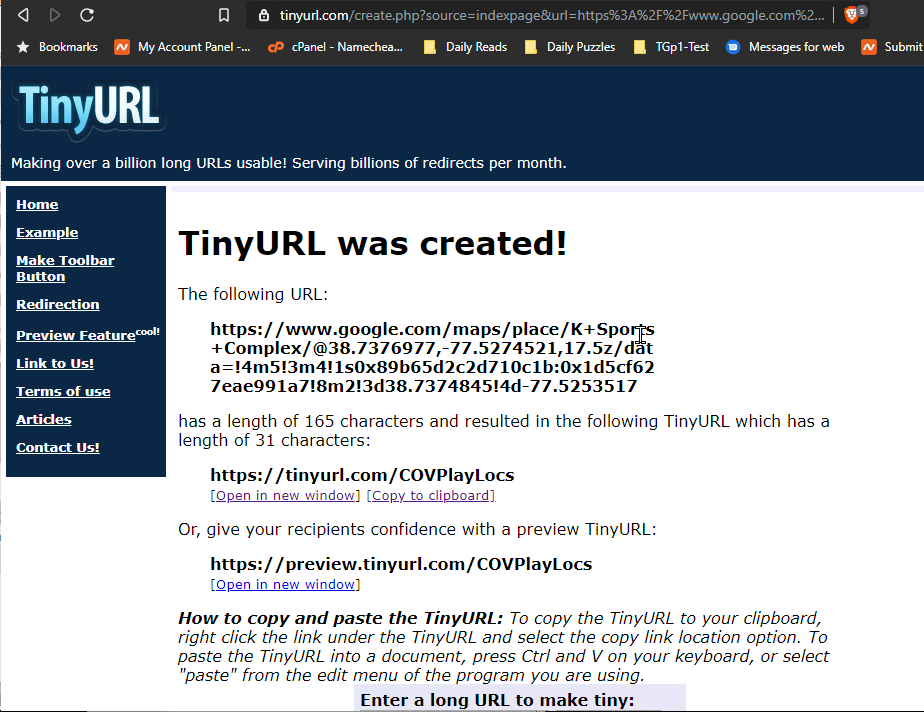
-
Enter a custom alias to define the location. Pick something fairly unique so that it doesn't already exist.
-
In the field for the specific Member/Team location, compose your HTML link as follows:
<a target='_blank' href='http://tinyrul.com/COVPlayLocs'>K Sports Comples</a> -
The full Game entry in the Tournament Brackets Remarks block would look like this, for example:
Game B Wed 11/7 3:30pm @ <a target='_blank' href='tinyrul.com/COVPlayLocs'>K Sports Comples<a/>
Notice that the link also includes a directive to open the map in a new window: target="_blank" ( Strange, indeed, but that's the magic of HTML.) This directive ensures that visitors will be able to remain on the Tournament Bracket page when they go to the Play Location map. They simply close that new window/tab to return to the Bracket page.
-
The entry in the grid would look like this:
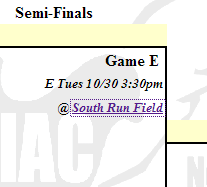 <==Click the link to see it in action...
 -
The link is also active in the remarks block:
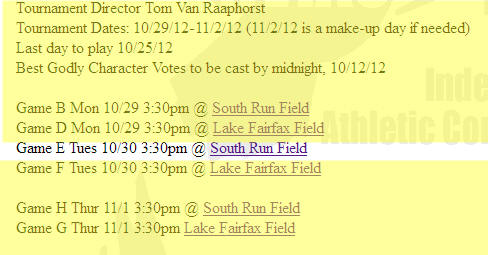 Click this link and see it in action, as well.
 -
Adding QR Codes for play location addresses. The QR Code is a smart-phone scannable code that provides a quick jump to a URL (and other destinations) just by scanning it with a smart-phone app. You can add the QR code to a tournament bracket using the same http://goo.gl address used just above. Using this link:
Game B Wed 11/7 3:30pm @ <a target="_blank" href="http://goo.gl/maps/MU9Uo">South Run Field<a/>
(from above), you can add the QR code by adding ".qr" to the end of the goo.gl address. It only works with goo.gl addresses. If you add:
<imb src="http://goo.gl/maps/MU9Uo.qr"/>
to the end of the previous line, you'll see this in the bracket:
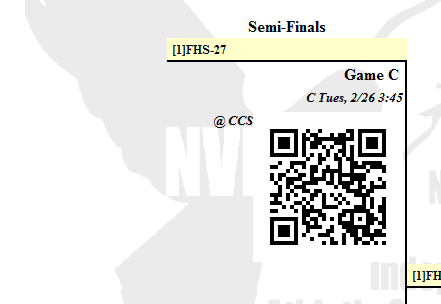
This scan code will take you to the same Google Maps location as the school (CCS) address. (NOTE: A CCS style attribute has been included in the page that automatically aligns the QR code to below the line where it appears.)
|
Adding Color to the grid: As you enter information in the Tournament Grid, you can change the emphasis by using color to highlight a label or phrase: Put <font color=red> Text to be Red</font> |
For example, if you want to highlight a game
change, in the Label Field, put
<font color=red> Game D**</font>
and, in the other Label Field, put
<font color=red> Game C**</font>
to show draw attention to that field. In the Remarks
section below, you can explain by entering:
<font color=red>**Game
D and Game C were switched to accommodate schedules. </font>
This will show as:
Lines above the highlighted text:
**Game D and Game C were switched to accommodate
schedules .<== Highlighted Text
Lines below.
You can also format words/lines/paragraphs by surrounding them with the following:
| Code: | Effect: | Code: | Effect: | Code: | Effect: |
| <b>BOLD</b> | BOLD | <i>Italic</i> | Italic | <u>Underlined</u> | Underlined |
| <font color=red>Color</font> | Color | You can also use colors: | blue,
green yellow,
orange, purple, white, black |
||
Hidden Comments: There is often a need to put comments into the Remarks block that you will use in the near future. You can "store" comments in the Remarts block by using the HTML Comment tags:
<!-- insert a comment that will not show in the browser here -->
Please note that the comment can be seen if you the viewer chooses "View Page Source." However, the comment will not show for the typical visitor who simply opens the page iu their browser.
Submenu Item: Click >here< to open the Tournament Brackets Page:
This page, which opens in a new window, takes you to Official Tournaments Brackets page from the main menu. Click on the Tournament of choice to see how it will show when users visit the website.
Note: If you don't see your bracket in the list, the Statistician will need to change the League Division status so that the Tournament Bracket will show for that League Division.
For example, when the Bracket is first created, all involved can see where they fall in the Tournament play schedule. As the play locations and times are identified and updated for each bracket, the will be shown every time the Tournament Brackets link is clicked for each division. As the play progresses, games scores and next-round participants will be identified and shown on this page as soon as they are entered by the Tournament Director/Bracket Creator.
At the end of the tournament week, the Statistician will Print the completed bracket to a PDF document. Each browser has the capability of saving the page to a PDF document. When you go to print to PDF, the default name to save to will be the lower case letter "t" followed by the 8-digit league division indicator. For example, t2020BBBM
When the document is saved, the extension will be <dot>pdf --> t2020BBBM.pdf
When the Tournament Bracket page is printed, the top menu and Division Choice dropdown menu will not be shown so that the Bracket can be printed most efficiently.
Resize the page during printing so that the remarks break onto the second page.
Note that you can choose another bracket from the drop-down list and click to the Go! button to view any of the available Brackets.
Consolation Games - to show or not to show:
If the league does not play Consolation Games under certain conditions
(such as too few teams in the division), you can suppress the showing of
the Consolation Bracket on the published, printable Brackets page.
Simply set both the Consolation Game Participants to the "Bye"
option. You must set both Consolation Game
Participants to Bye to hide the Consolation Bracket.
Division with fewer participants: If you have
fewer than eight participants, you can use Round 1 for
play-in games. For example, click >> here<<
to see how to set up a four team Division. Notice that the printed
version of the Tourney Bracket labels the Games, A, B, C & D, and
suppresses the unused Round 1. You may still suppress the Consolation
Game, if desired, by following the steps shown just above.
![]()
Menu Item: Tools-Missing Items
This opens a tabbed page to allow quick access to Statistician tools to locate items that are not apparent from exising Statistican Admin menu items.
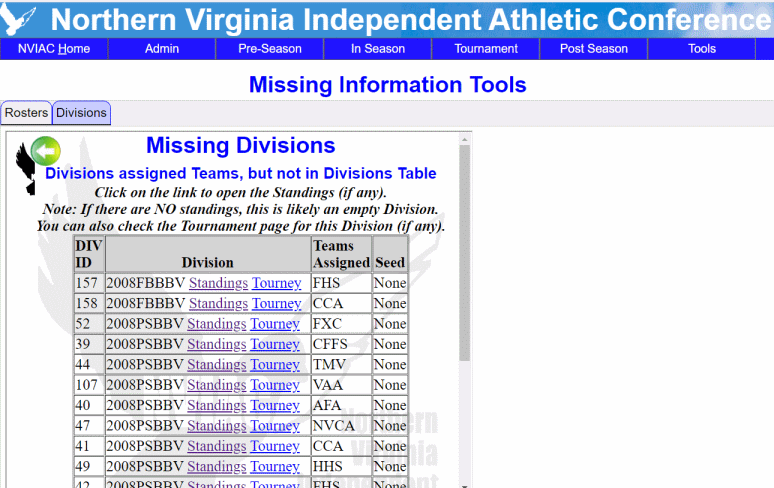
The current tools are:
-
Missing Rosters: During the Season, AD's send their team rostors for each team in the Division. This tool will check existing Divisions and see if there's a roster uploaded for every team in each Division. Use the information to contact the AD's and request missing rosters.
-
Missing Divisions: If a Division record is deleted inadvertently, the Teams Assigned and the Standings and Tournaments are now orphans. This tool checks the database for Divisions that have teams assigned and season games and, possibley Tournament Games.
If the Division has been removed, simply restore it on the Create Divisions page. -
Missing Game Scores: The game scores are submitted and the Statistician accepts the scores into the Standings database. If a score is reported twice, the duplicate is noticed and is not added to the Standings.
if the Statistician needs to check for missing scores, this tab shows all of the scores that have been submitted, including duplicates. The Statistician can use this page to work with any teams that are seeking missing scores. The lists can be limited to a specific team, for ease of review.
Menu Item: Log Out
This allows the Statistician to lock the system at the end of an update session. When you Log Out, you'll see this screen:

Click on any of the Statistician menu options to log back in.
![]()
Menu Item: Webmaster Info

This page is for the Statistician or Webmaster provide guidance on how the NVIAC website and associated systems (Google Workspace (formerly Google G-Suite)), email addresses, forwarding, hosting, domain names, etc. It links to:
What's New
This page documents updates and changes to the NVIAC website. It is accessible to the Statistician, not the visitor to the website.
Wish List
This is the ToDo list of improvements. Ideas are parked here until they are incorporated or discarded.
Notes
This has a listing of widgets and code that can be copied and pasted into a page for consistence. Examples include Top button, the Close window green arrow button, and the fixed Jump List at the top of pages that have lost of links (members page, for one.
Menu Item: Edit Admin
This page is for the Statistician to alert site visitors to new things that need to be advertised. New functions available to the visitor; new information in the site; upcoming events that the visitor needs to be aware of.
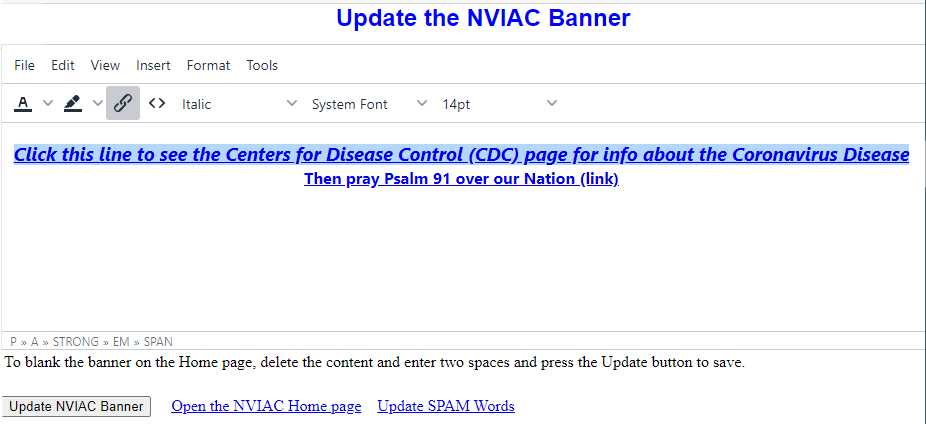
To update the notice for the visitor banner, click on the Edit Main Page Banner link. The current banner will show in the Edit page.
Modify the text that is to be shown on the banner and then press the click the Update NVIAC Banner button to save it. The text can be modified by adding HTML tags (the example above has a <b>bold tag, an <em> emphasize (italic) tag, and a <font color="red"> font color tag.
Update SPAM words
The Contact Us database and the Message Processing Administrative System has been replaced with at static page that directs all visitors to send emails directly to the appropriate person. So there's no need to have a SPAM Words processor.
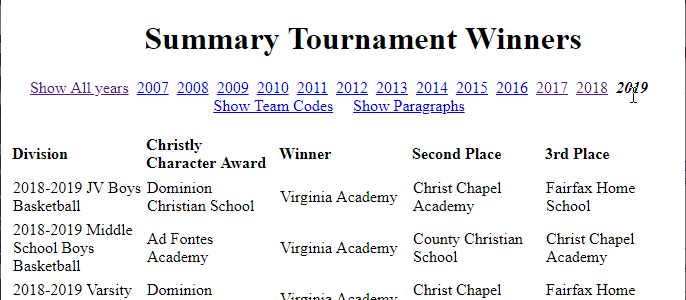
Menu Item: Show Summary Tournament Winners
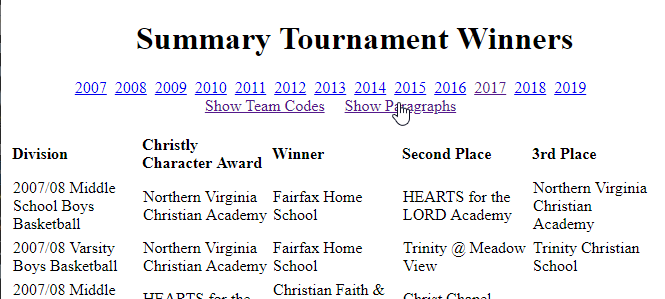
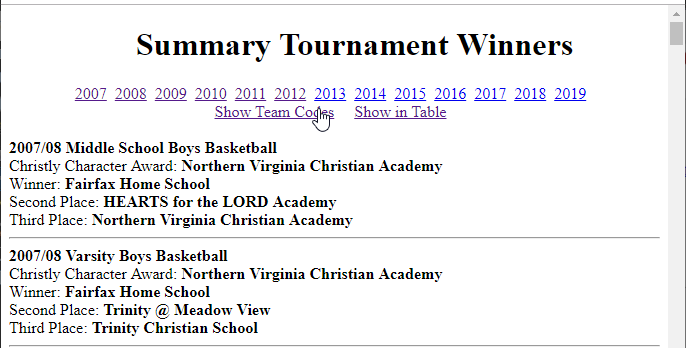
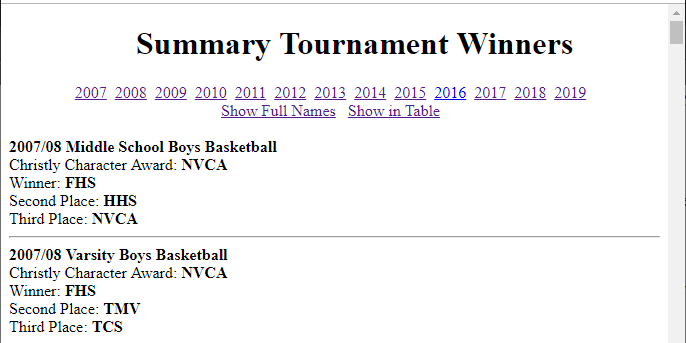
This page shows a summary of the winners for every Tournament in the NVIAC database. You can view the winners in various formats. Show in a table or in paragraphs (easier to copy to a Word document, for example), Show all or a specific year. Show with Team Codes or Full Names.
Showing Year 2019, Full Names, in a Table:
Showing All Years, Full Names, in a Table:
Showing All Years, Full Names, in a Paragraph:
Showing All Years, Team Code Names, in a Paragraph:
AD-only Member's Page
This provides a quick way for the Statistician to open the AD-only Members page, wihout having to go to the NVIAC Home page, click on Member Info and add the phrase at the end to see the AD-only version of the Members page.
Uploading to the Web (e.g., Archiving Standings and Tourney Brackets)
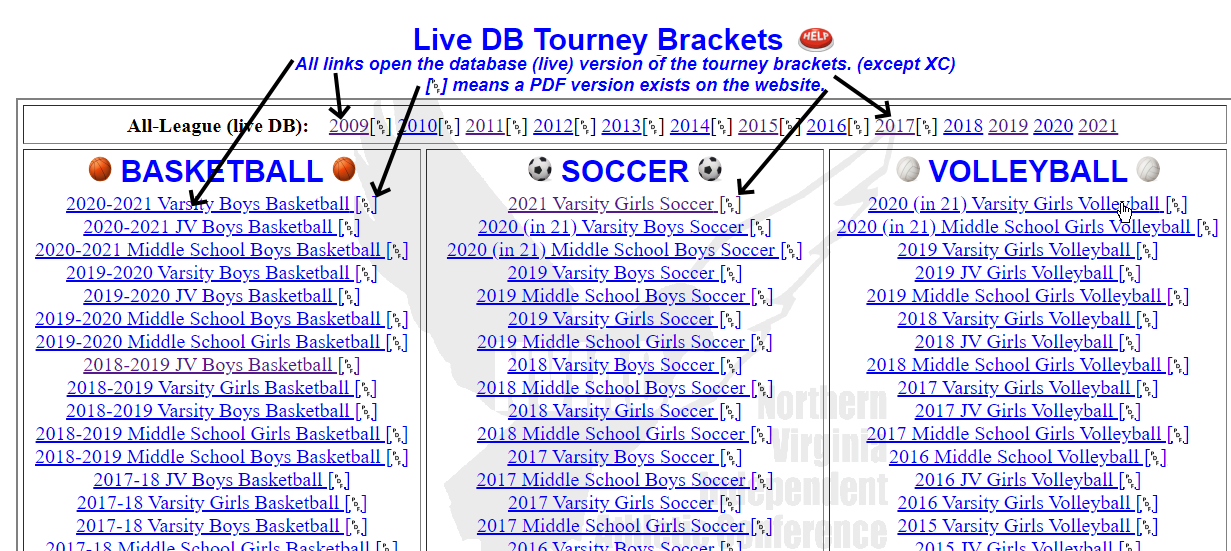
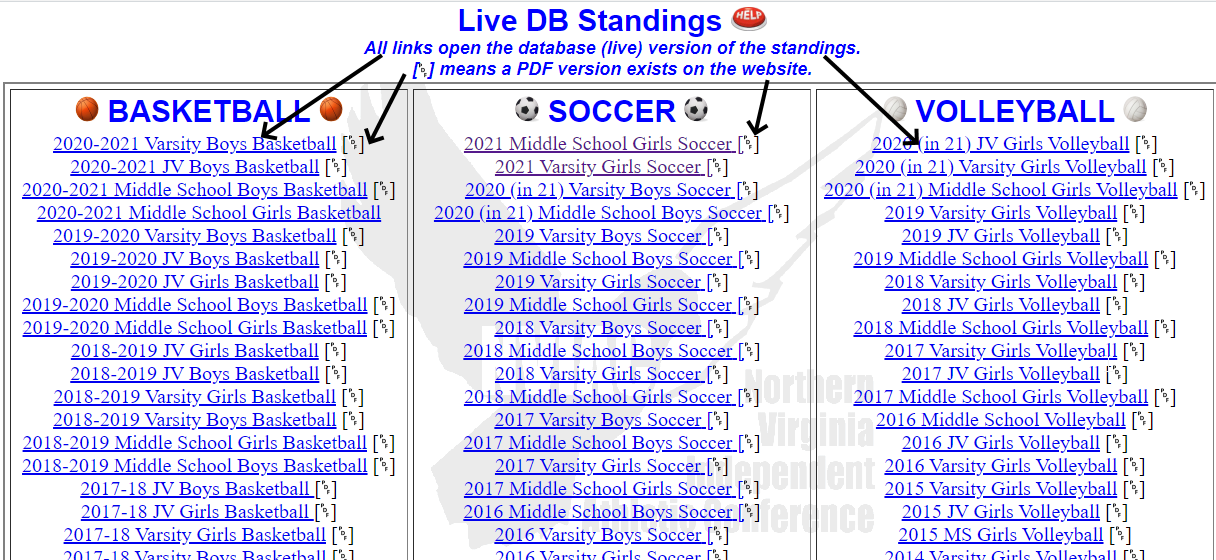
At the end of the season, it is no longer necessary for the Standings and Tourney Brackets to be live. The Statistician will use the use the Google Chrome browser or the Internet Explorer browser to save an Adobe Reader (PDF) version of the Standings and Tournament results pages. The pages will then be uploaded to the archive folder on the web site. When the Standings and Tournaments pages are generated, they check for a PDF for each Division and use that link on the page if it exists. Otherwise, it shows the link to the live pages in use during the season. Since the Standings occur just before the Tournament, you may upload the Standings when they are complete and then upload the Tournament results when the Tournament has ended.
NOTE: Reference ALL of the live DB version of the Standings and Tournaments via the Tourney Live and Standings Live page.
Naming Conventions
For the archive pages to be recognized, they have to be named as follows:
Standings PDF files: the name starts with the lower case letter s, followed by the nine character Division designation. When you print the PDF standings document, the filename defaults to "s" followed by the league division designation.
For example, the 2013 Middle School Boys Flag Football standings page will default to a PDF document with this name: s2008FBBM.pdf
which would be reached on the website at this location:
Tournament PDF files: The naming convention is similar: the name starts with the lower case t, followed by the Division designation. When you print the PDF tournament document, the filename defaults to "t: followed by the league division designation.
In this same example, you would save the tournament results PDF file with this name: t2008FBBM.pdf
which would be reached on the website at this location:
Season PDF Schedules: The naming convention is similar. the name starts with a lower case d, followed by the Division designation. Follow the instructions above to get this designation. Save the Season Schedule PDF file.
In this same example, you would save the season schedule PDF file with this name: d2013FBBM.pdf
which would be reached on the website at this location:
Uploading to the Web archive
The final step is to upload the archived files or files. All upload pages are consolidated on a single upload page, with specific tabs for each type of upload.

![]() Upload Standings/Brackets/All-League
PDFs:
Upload Standings/Brackets/All-League
PDFs:
The easiest way is to use the Upload PDF function from the Statistician's or Tournament Director's menus. Use this to upload PDF's of the season's final Standings page, the season's final Tournament Bracket page, and, if available, a season schedule at the beginning of the season (e.g., Flag Football).
When you click this option, you'll see the upload page:
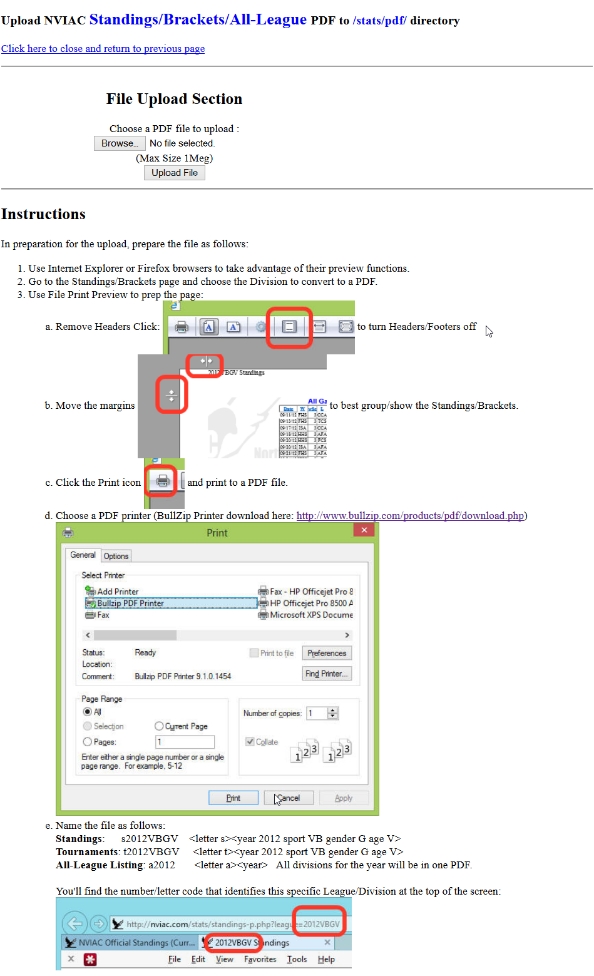
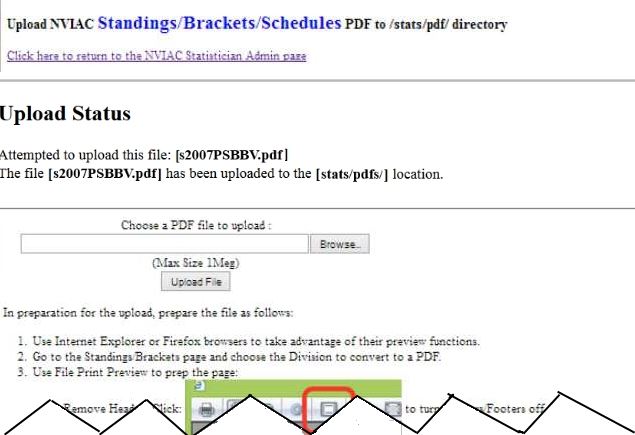
The Choose a PDF file to upload box is where you enter the file to upload to the website. Click the Browse button to find the file you've just created. Note that below the upload box, there are extensive suggestions on how to create a well-formatted PDF for uploading.
When you have found the PDF file, click the Upload File button, to upload the file. You'll get the status inserted in the Upload page confirming a successful upload, or failure.
You can enter a new file to upload in the form just below the status page.
If you get a failure, then turn to the Alternate Method below to troubleshoot and upload the file.
![]() Upload Rosters
PDF:
Upload Rosters
PDF:
This is similar to the Upload Stats/Brackets PDF function. It is the easiest way is to upload Rosters to the website.
When you receive rostes from AD's who don't have their own website with their rosters hosted, you can upload a PDF of their rosters and put the NVIAC hosted past on the Members Page.
When you click this option, you'll see the upload page:
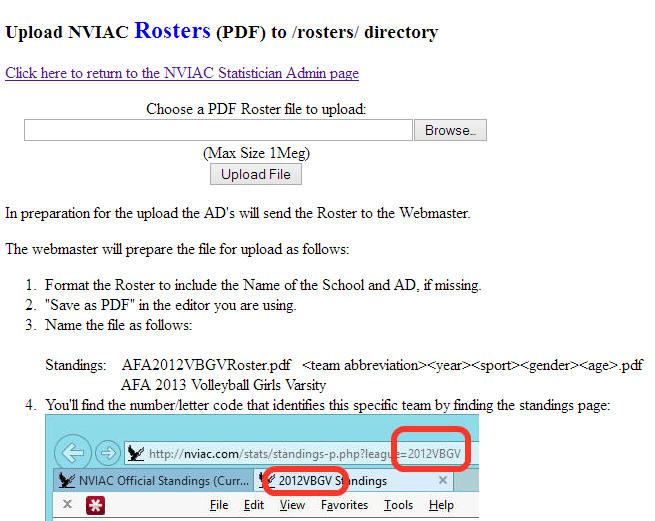
The Choose a PDF Roster file to upload box is where you enter the file to upload to the website.
Click the Browse button to find the file you've just created. Note that below the upload box, there are extensive suggestions on how to create a well-formatted PDF Roster for uploading.
When you have found the PDF file, click the Upload File button, to upload the file. You'll get the status inserted in the Upload page confirming a successful upload, or failure.
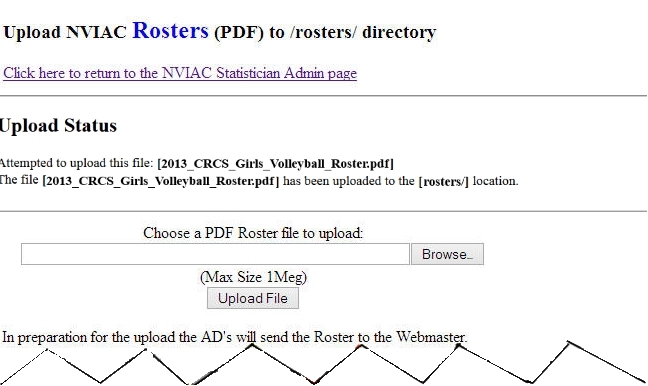
You can enter a new file to upload in the form just below the status page.
If you get a failure, then turn to the Alternate Method below to troubleshoot and upload the file.
This is similar to the Upload Stats/Brackets PDF function. It is the easiest way is to upload Schedules to the NVIAC website.
Some schools have their schedules on their websites. For those schools, enter the URL for their Athletic Schedules page into the Members record under the Team Schedules Website field.
For those schools/teams where the AD sends their current schedule to the webmaster, here's the preparation before you upload their schedules:.
- Combine all schedules into one file and save it as a PDF.
- Name the PDF to identify the year (2013, 2014, etc.), school (AFA, FHS, etc.) and the team(s) (Girls VB BoysSoc, etc.)
- Browse for the file you've created above, and click the Upload File button.
The last step is to go to the Members Update page, and enter the URL to the PDF (/skeds/2103AFABasketall.pdf) in the Team Schedules Website field.
When you click this option, you'll see the upload page:
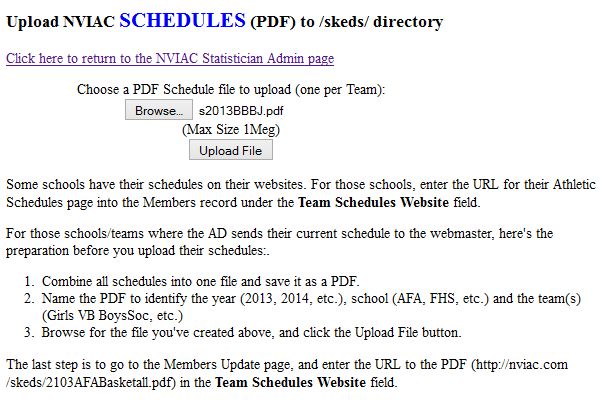
The Choose a PDF Roster file to upload box is where you enter the file to upload to the website.
Click the Browse button to find the file you've just created. Note that below the upload box, there are extensive suggestions on how to create a well-formatted PDF Roster for uploading.
When you have found the PDF file, click the Upload File button, to upload the file. You'll get the status inserted in the Upload page confirming a successful upload, or failure.
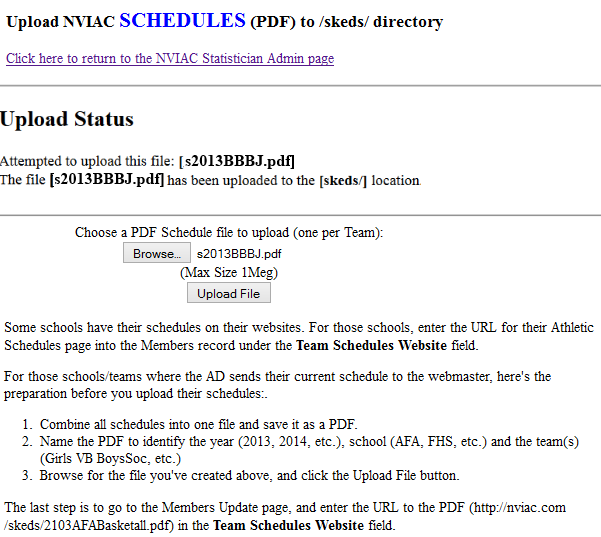
You can enter a new file to upload in the form just below the status page.
If you get a failure, then turn to the Alternate Method below to troubleshoot and upload the file.
![]() Upload Team/School Pictures and Logos:
Upload Team/School Pictures and Logos:
This is similar to the previous Upload functions. It is the easiest way is to upload Pictures and Logos to the NVIAC website.
Some schools have their logos on their websites. If you can get the logo from their website, that is the fastest way to obtain the logo. Otherwise, you'll need to contact the AD and ask for a picture of their School/Team logo. Ideally, they can send you an electronic copy, but if all else fails, you could scan any hard copy they send and capture the logo in that way.
Here are the Instructions:
In preparation for the upload, obtain a picture from the AD's that will represent them (a head shot, preferably), and, if adding a new team, a logo of their school.
The webmaster will prepare the images for upload as follows:
- Athletic Director Pictures:
- Keep the original picture you receive, and name it <TEAMCODE>_original.jpg (e.g., AFA_original.jpg, or FHS_original.png, etc.)
- Convert the picture to PNG (Portable Network Graphics) format.
- Size the pictures to 100 pixels x 100 pixels for upload.
- Name the picture (all lowercase): <teamcode>_pic.png (e.g., afa_pic.png, fhs_pic.png, etc.)
- Upload both the 100x100px images -- the images will stored be in the /images/team/ folder
- Use a File Transfer Program (FTP) client to upload the Originals to the /images/team/origs folder. This will give you access to the pictures from any location.
-
Team/School Logo/Icon:
- Ask the AD for a school icon or logo. If you don't get a logo from the School/Team AD, you may be able to find the logo on the Internet.
- Keep the original logo you receive, and name it <TEAMCODE>_original_logo.jpg (e.g., AFA_original_logo.jpg, or FHS_original_logo.png, etc.)
- Name the logo to upload: <teamcode>_icon.png (e.g., afa_icon.png, fhs_icon.png, etc.)
- d both the 100x100px images -- the images will stored be in the /images/team/ folder
- Use a File Transfer Program (FTP) client to upload the Originals to the /images/team/origs folder. This will give you access to the pictures from any location.
- A confirmation will appear at the top indicating that the file upload was or was not successful.
- On the Maintain League Member School/Team page you'll see the two icons below the Team Name to confirm that the icons and pictures have been uploaded to the site correctly.
When you click the Upload option, you'll see the upload page:
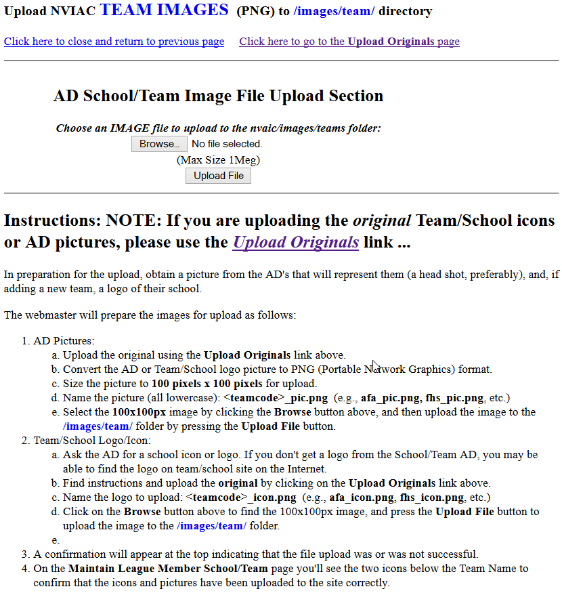
Click the Browse button to find the file you've just created. Note that below the upload box, there are extensive suggestions on how to create a properly crafted, named, and sized picture or icon for uploading.
When you have found the image, click the Upload File button, to upload the file. You'll get the status inserted in the Upload page confirming a successful upload, or failure.
You can then Browse for a new image to upload in the form just below the status page.
If you get a failure, then turn to the Alternate Method below to troubleshoot and upload the file.
Alternate Method for Uploading:
Another way is to use a free file upload program such as FileZilla. (Go to http://filezilla-project.org/download.php to download and install the latest version).
The Statistician will use the username and password assigned by the network administrator to connect to the archive site and upload the PDF files.
It is important that the naming convention be followed exactly -- the Standings and Tournament listing pages will only point to the PDF file if the name of the PDF matches the convention exactly.

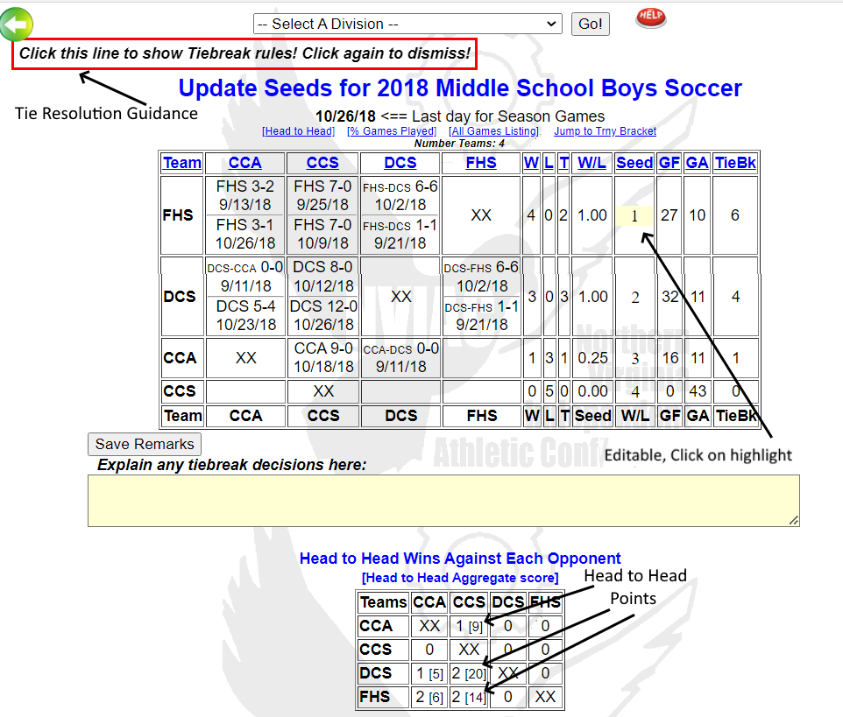
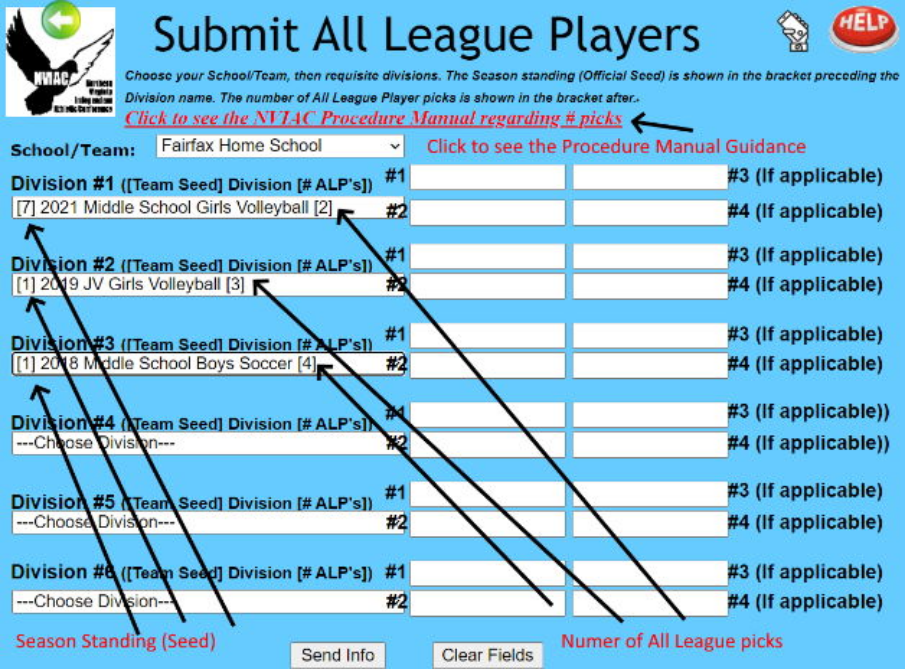 ---
---